Web Guide
How-to guide for every feature on the Supatimer web dashboard. Each section includes step-by-step instructions.
Video Tour
Watch a 7-minute walkthrough covering bot setup, team configuration, and all key features.
Chapters
Questions or feedback? Join our Discord community for help.
Join DiscordFeatures
Dashboard Overview
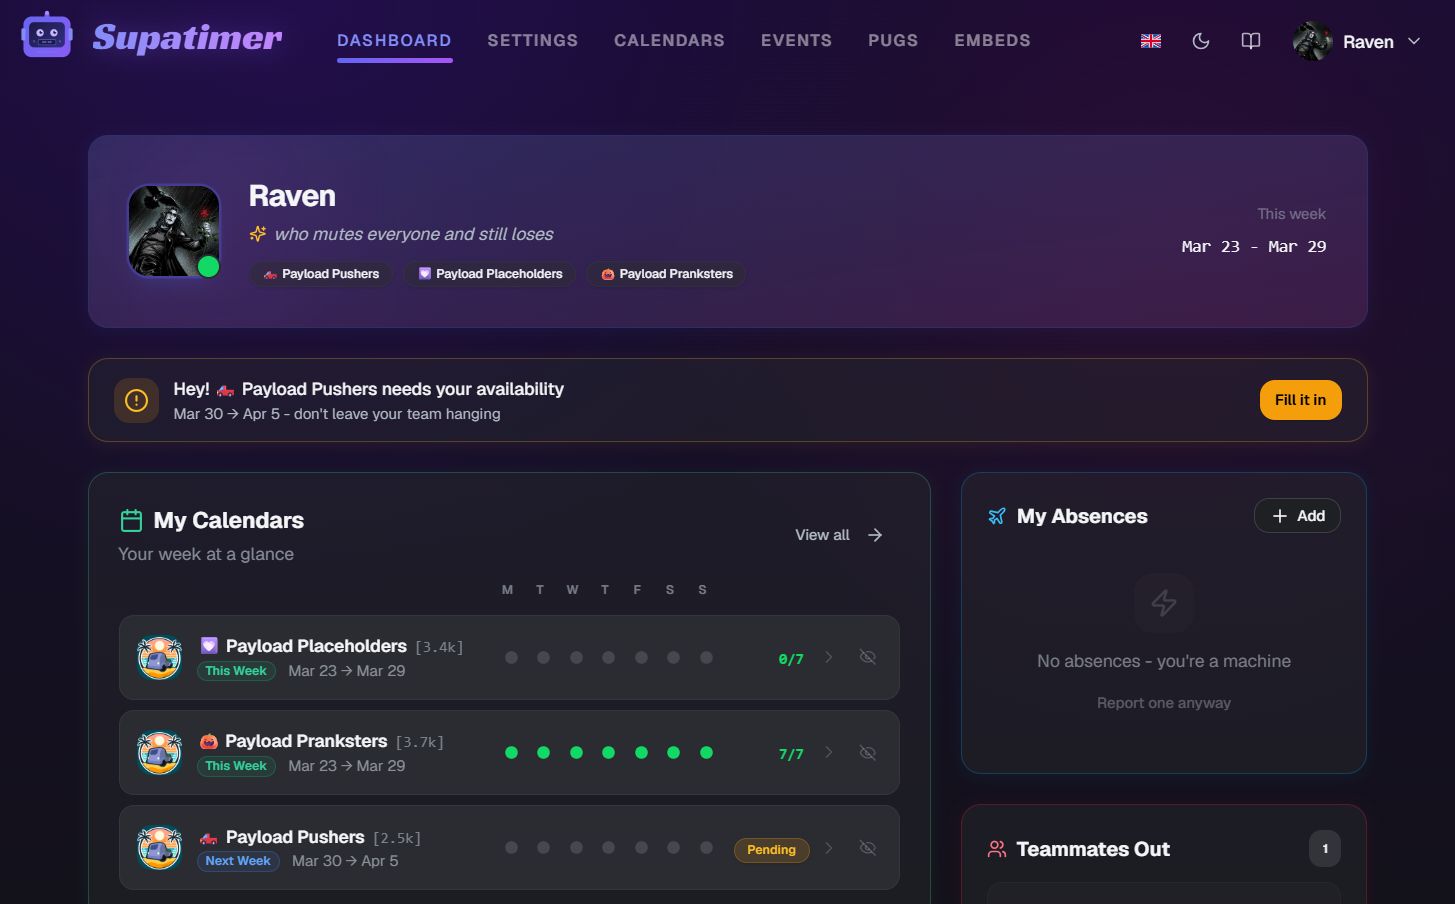
The dashboard is your home base. It shows your active calendars, upcoming scrims, recent results, and team absences at a glance.
How to use
- 1At the top you'll see an action banner if any calendars need your response. Click it to jump straight to the calendar.
- 2The 'My Calendars' section lists every team calendar you're part of. Each card shows availability dots (Mon-Sun) and whether you've responded.
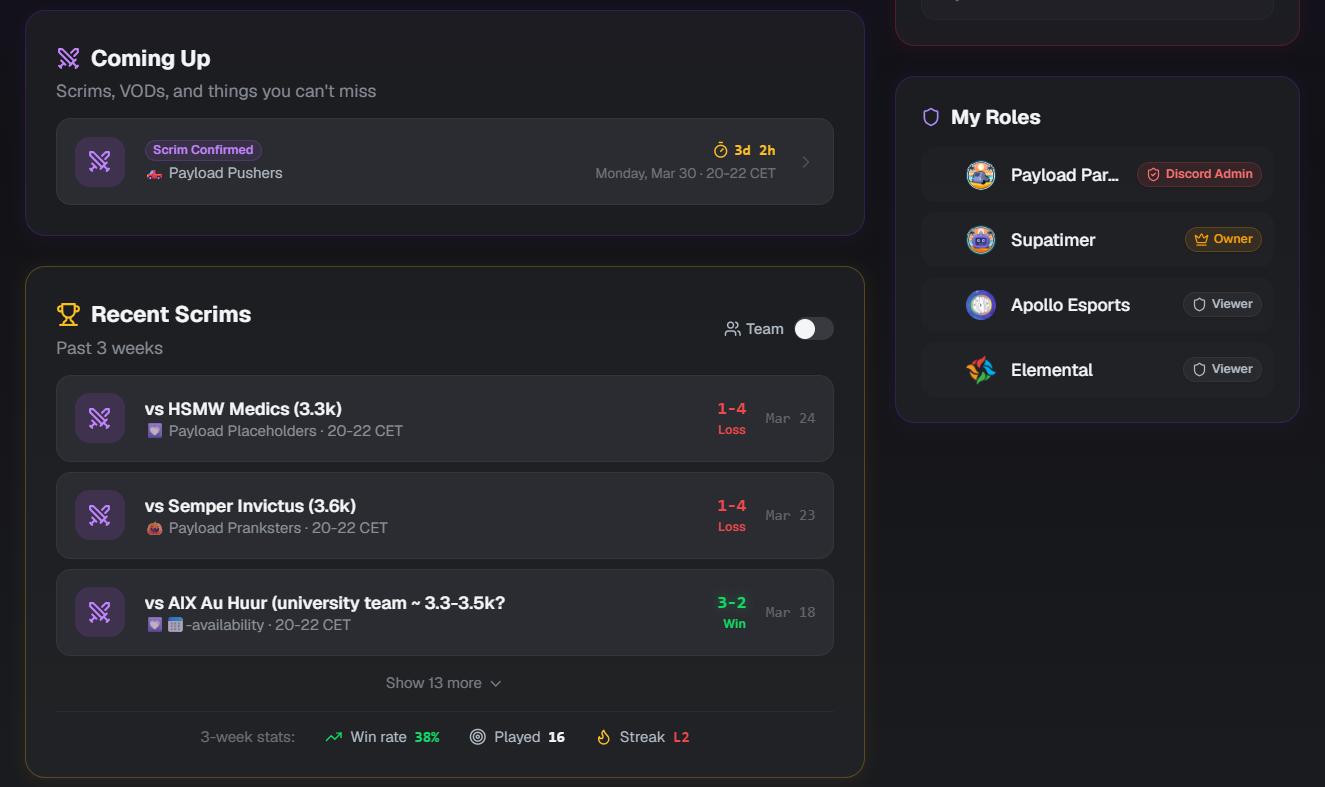
- 3The 'Upcoming Activities' section shows confirmed scrims, preliminary lineups, and other team activities with countdown timers.
- 4The 'Recent Scrims' section shows past scrim results with win/loss/draw scores. Use the filter to show all teams or just yours.
- 5The right sidebar has quick-access cards: My Absences, My Permissions, and Poll Requests.
Watch
Screenshots
Calendars
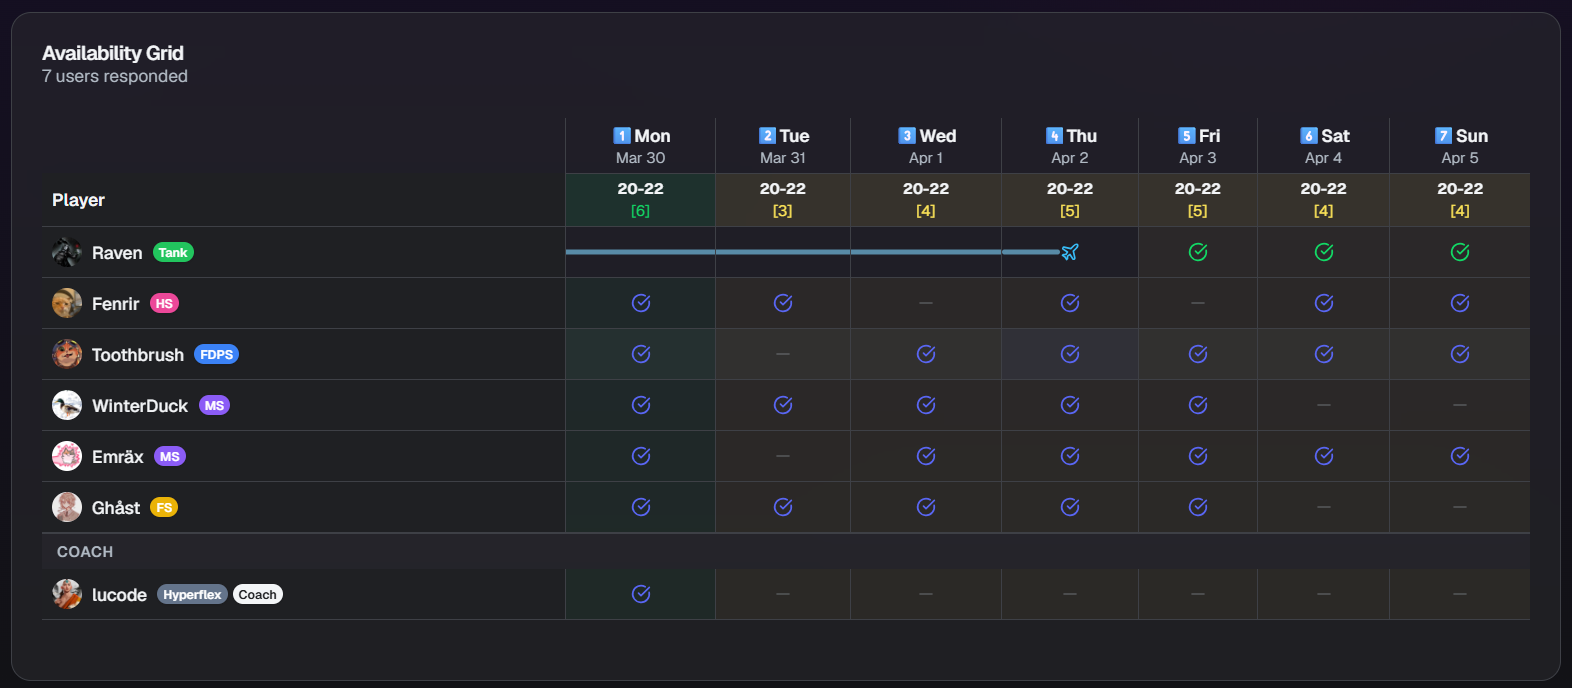
Weekly availability calendars are posted by the bot in Discord and visible on the web. Each calendar shows time slots and who is available.
How to use
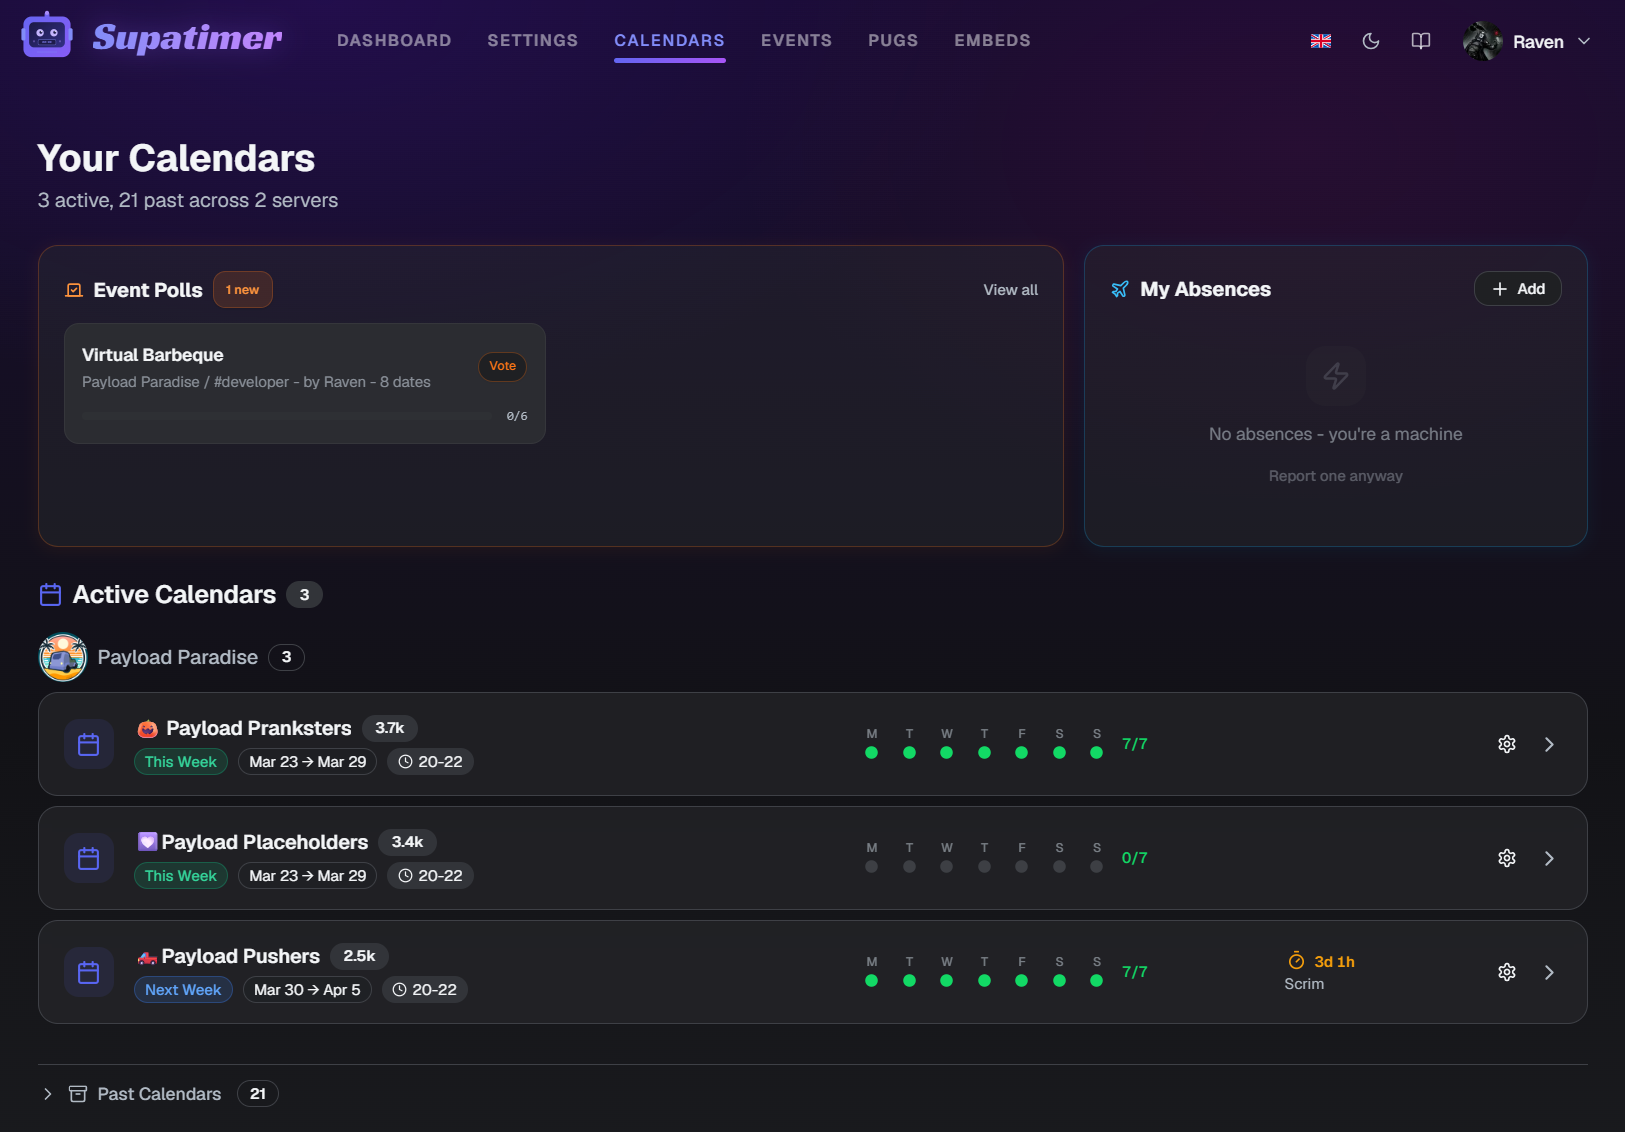
- 1Navigate to 'Calendars' from the top nav. Calendars are grouped by server, with active ones shown first.
- 2Each calendar card shows the team name, date range, and a summary of how many people have responded.
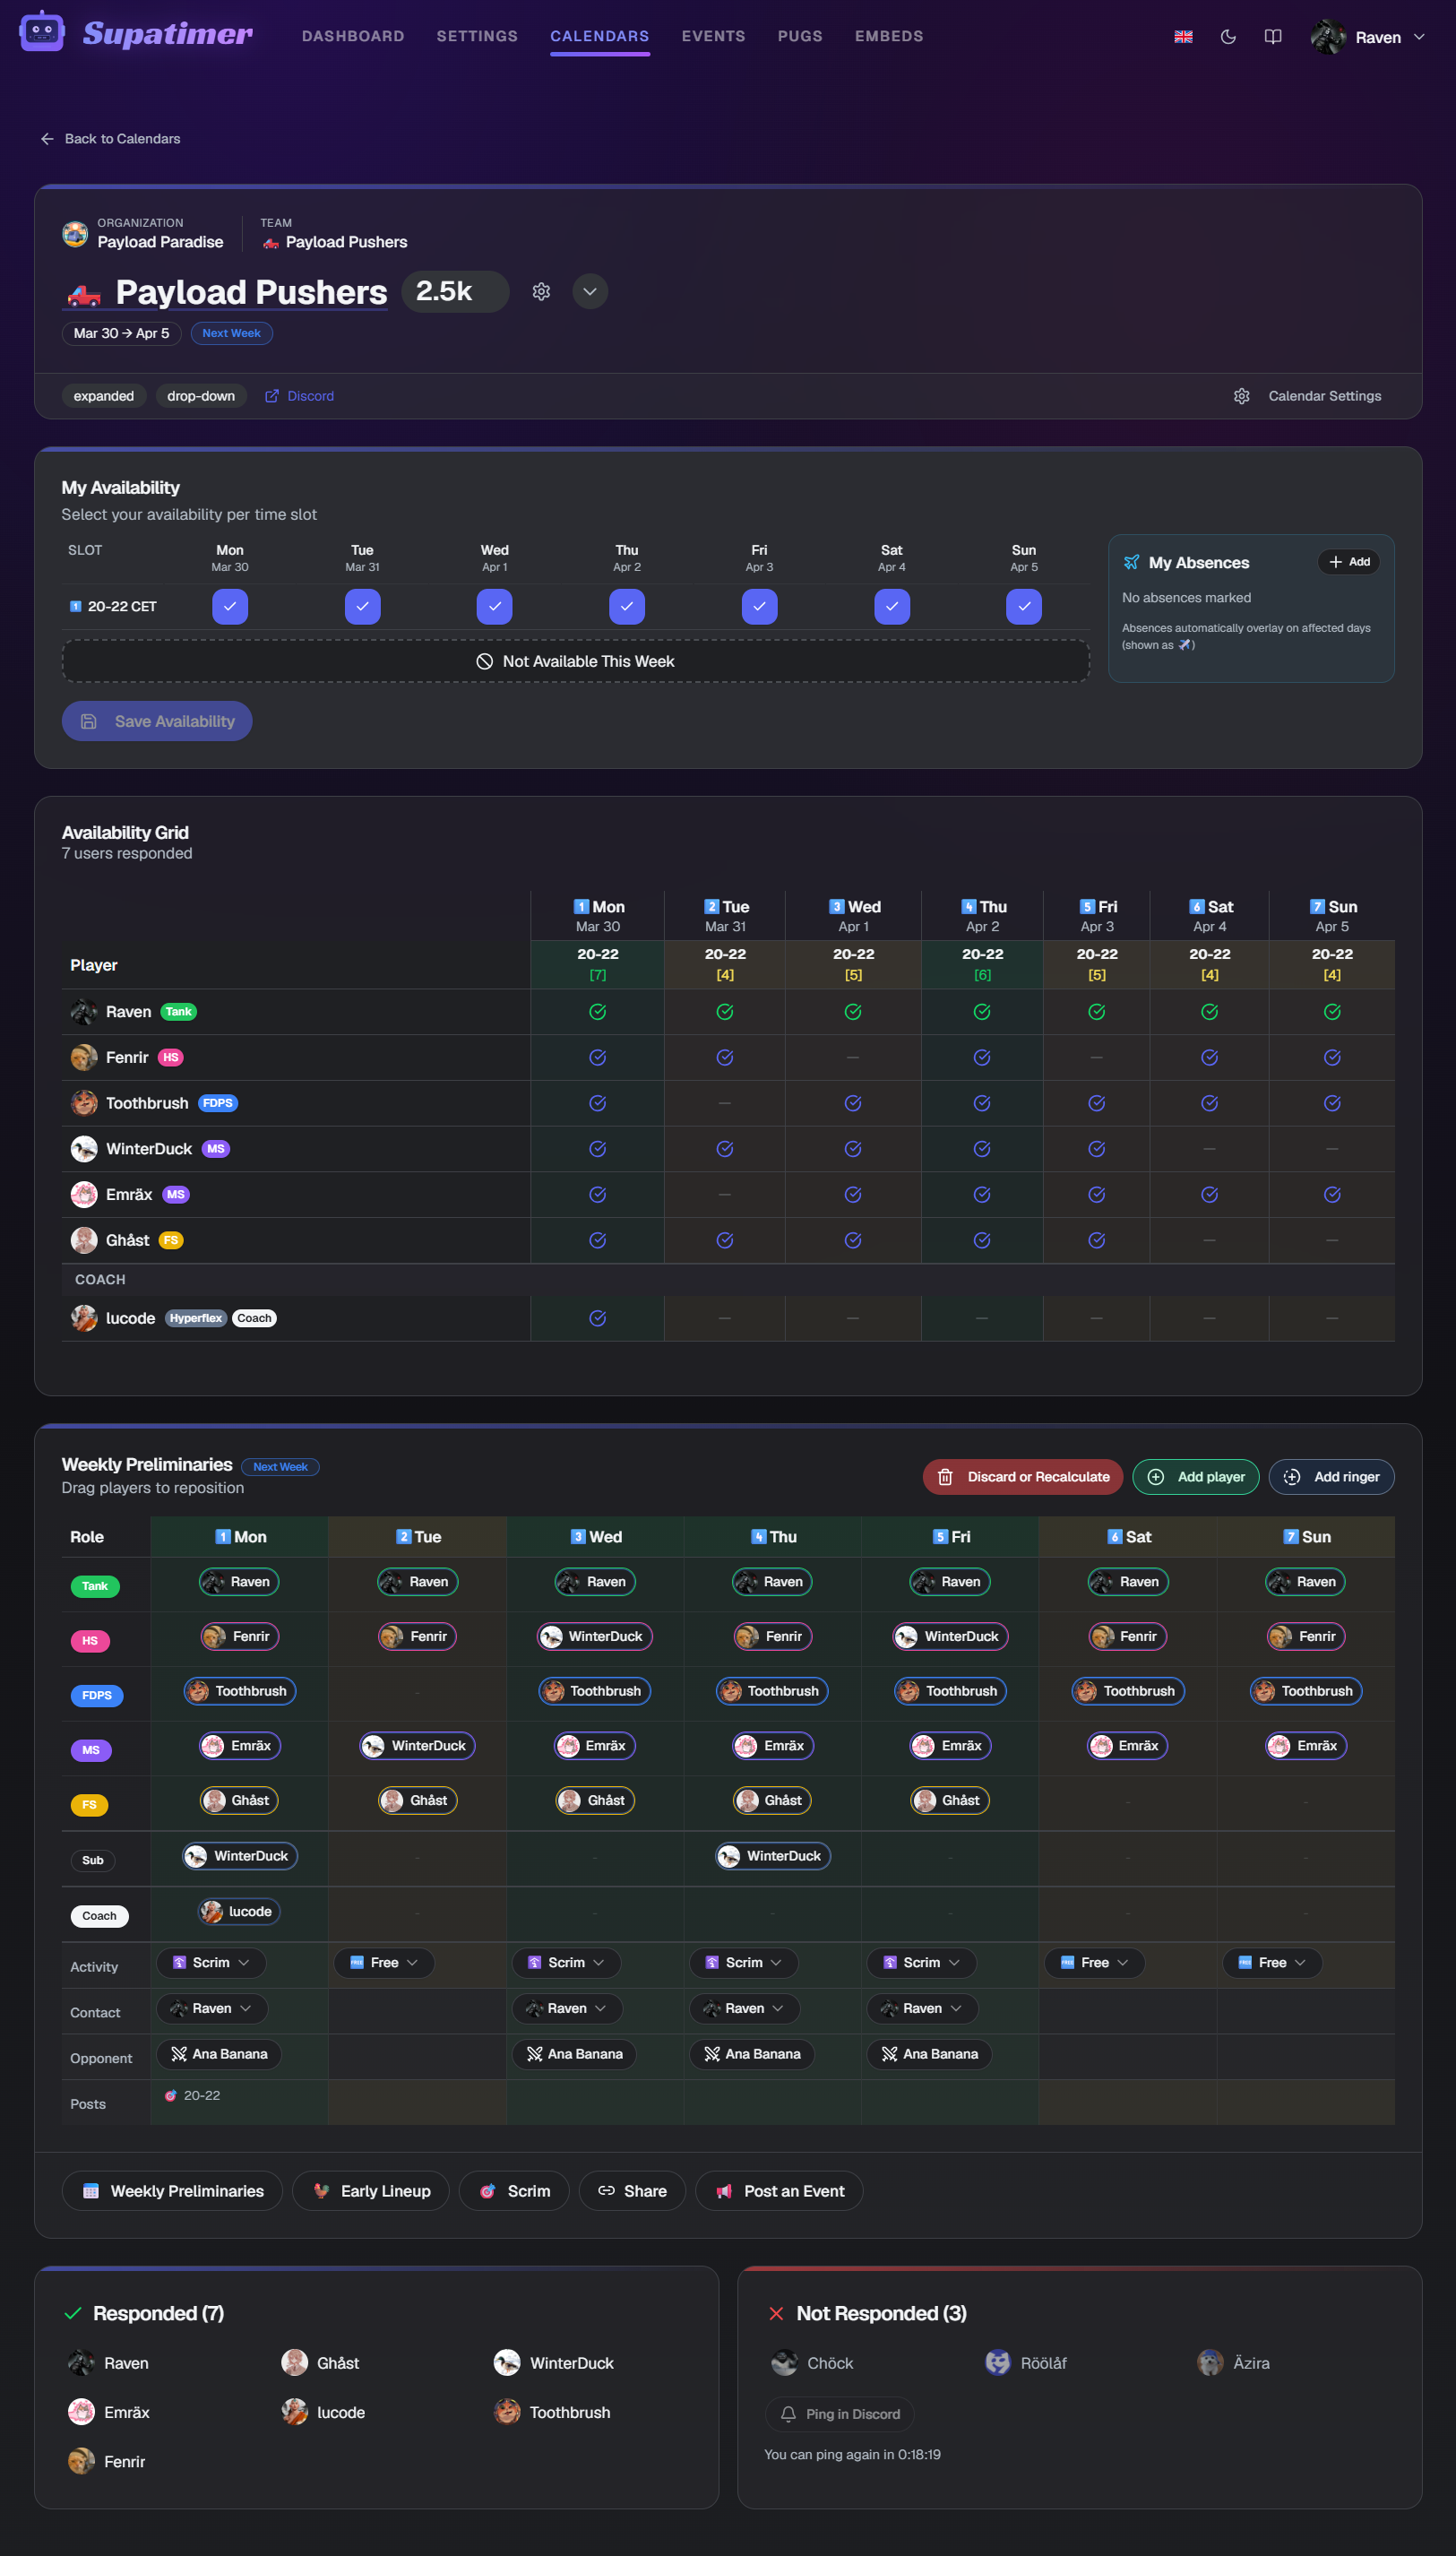
- 3Click a calendar card to open the detail view. Here you can see the full availability grid.
- 4The availability dots on each card show a quick visual of Mon-Sun status: filled = responded, empty = pending.
- 5Past calendars are collapsed at the bottom of the page. Click to expand them.
- 6Open a calendar's settings (the gear on the calendar page) to edit its ping roles and schedule. Team managers also get the team's Post messages, Discord Names and Calendar/Post Layouts there - the same cards as in Team Settings, so you can adjust how posts look without leaving the calendar.
Watch
Screenshots
Event Planner
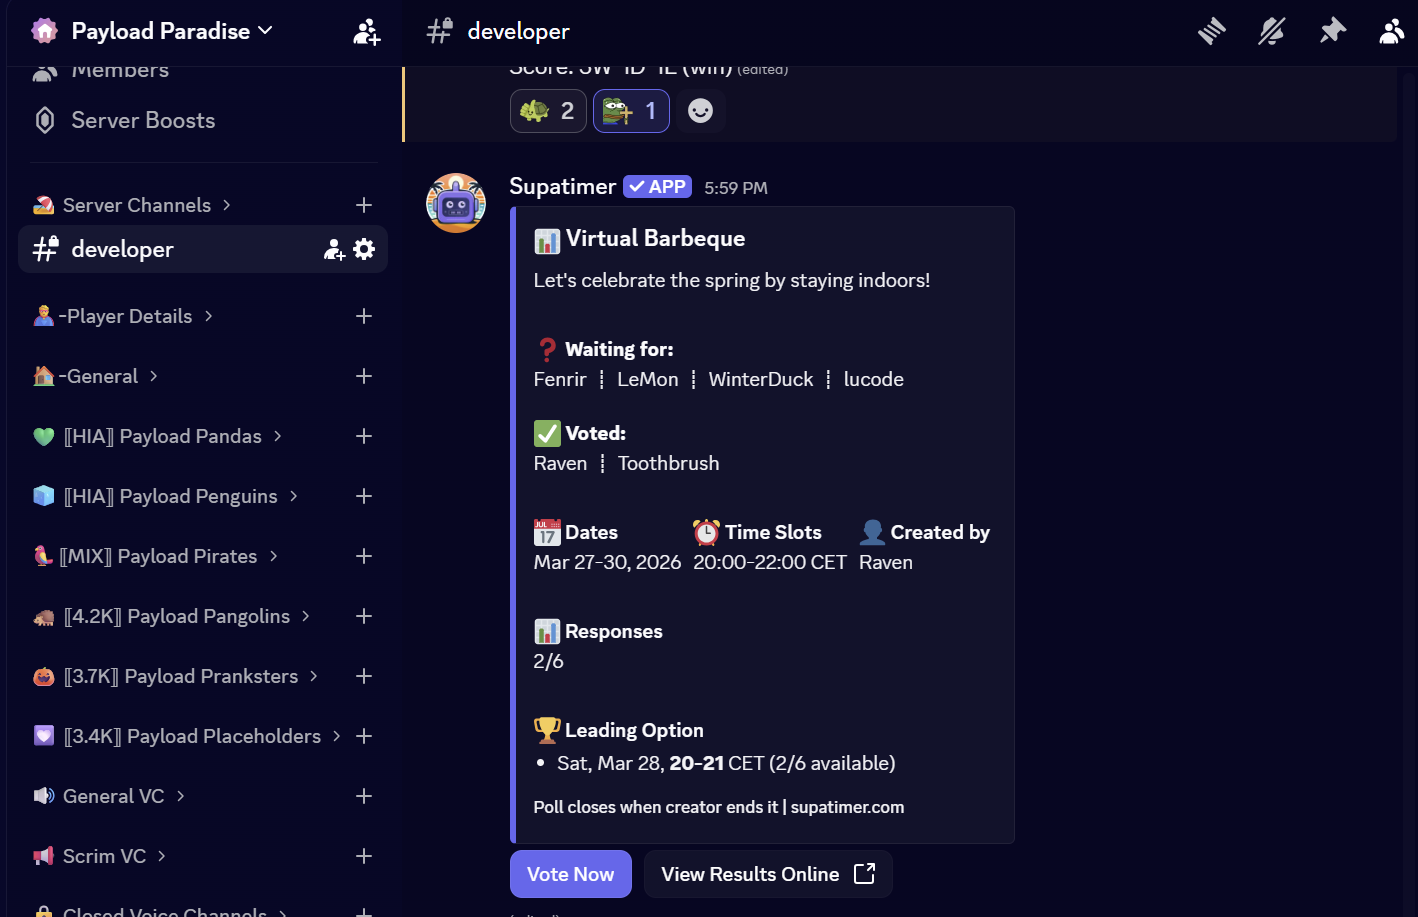
Event Planner lets admins ask the team questions and collect votes. Polls appear both in Discord and on the web.
How to use
- 1Navigate to 'Event Planner' from the top nav. Polls are grouped by status: open, closed, and past.
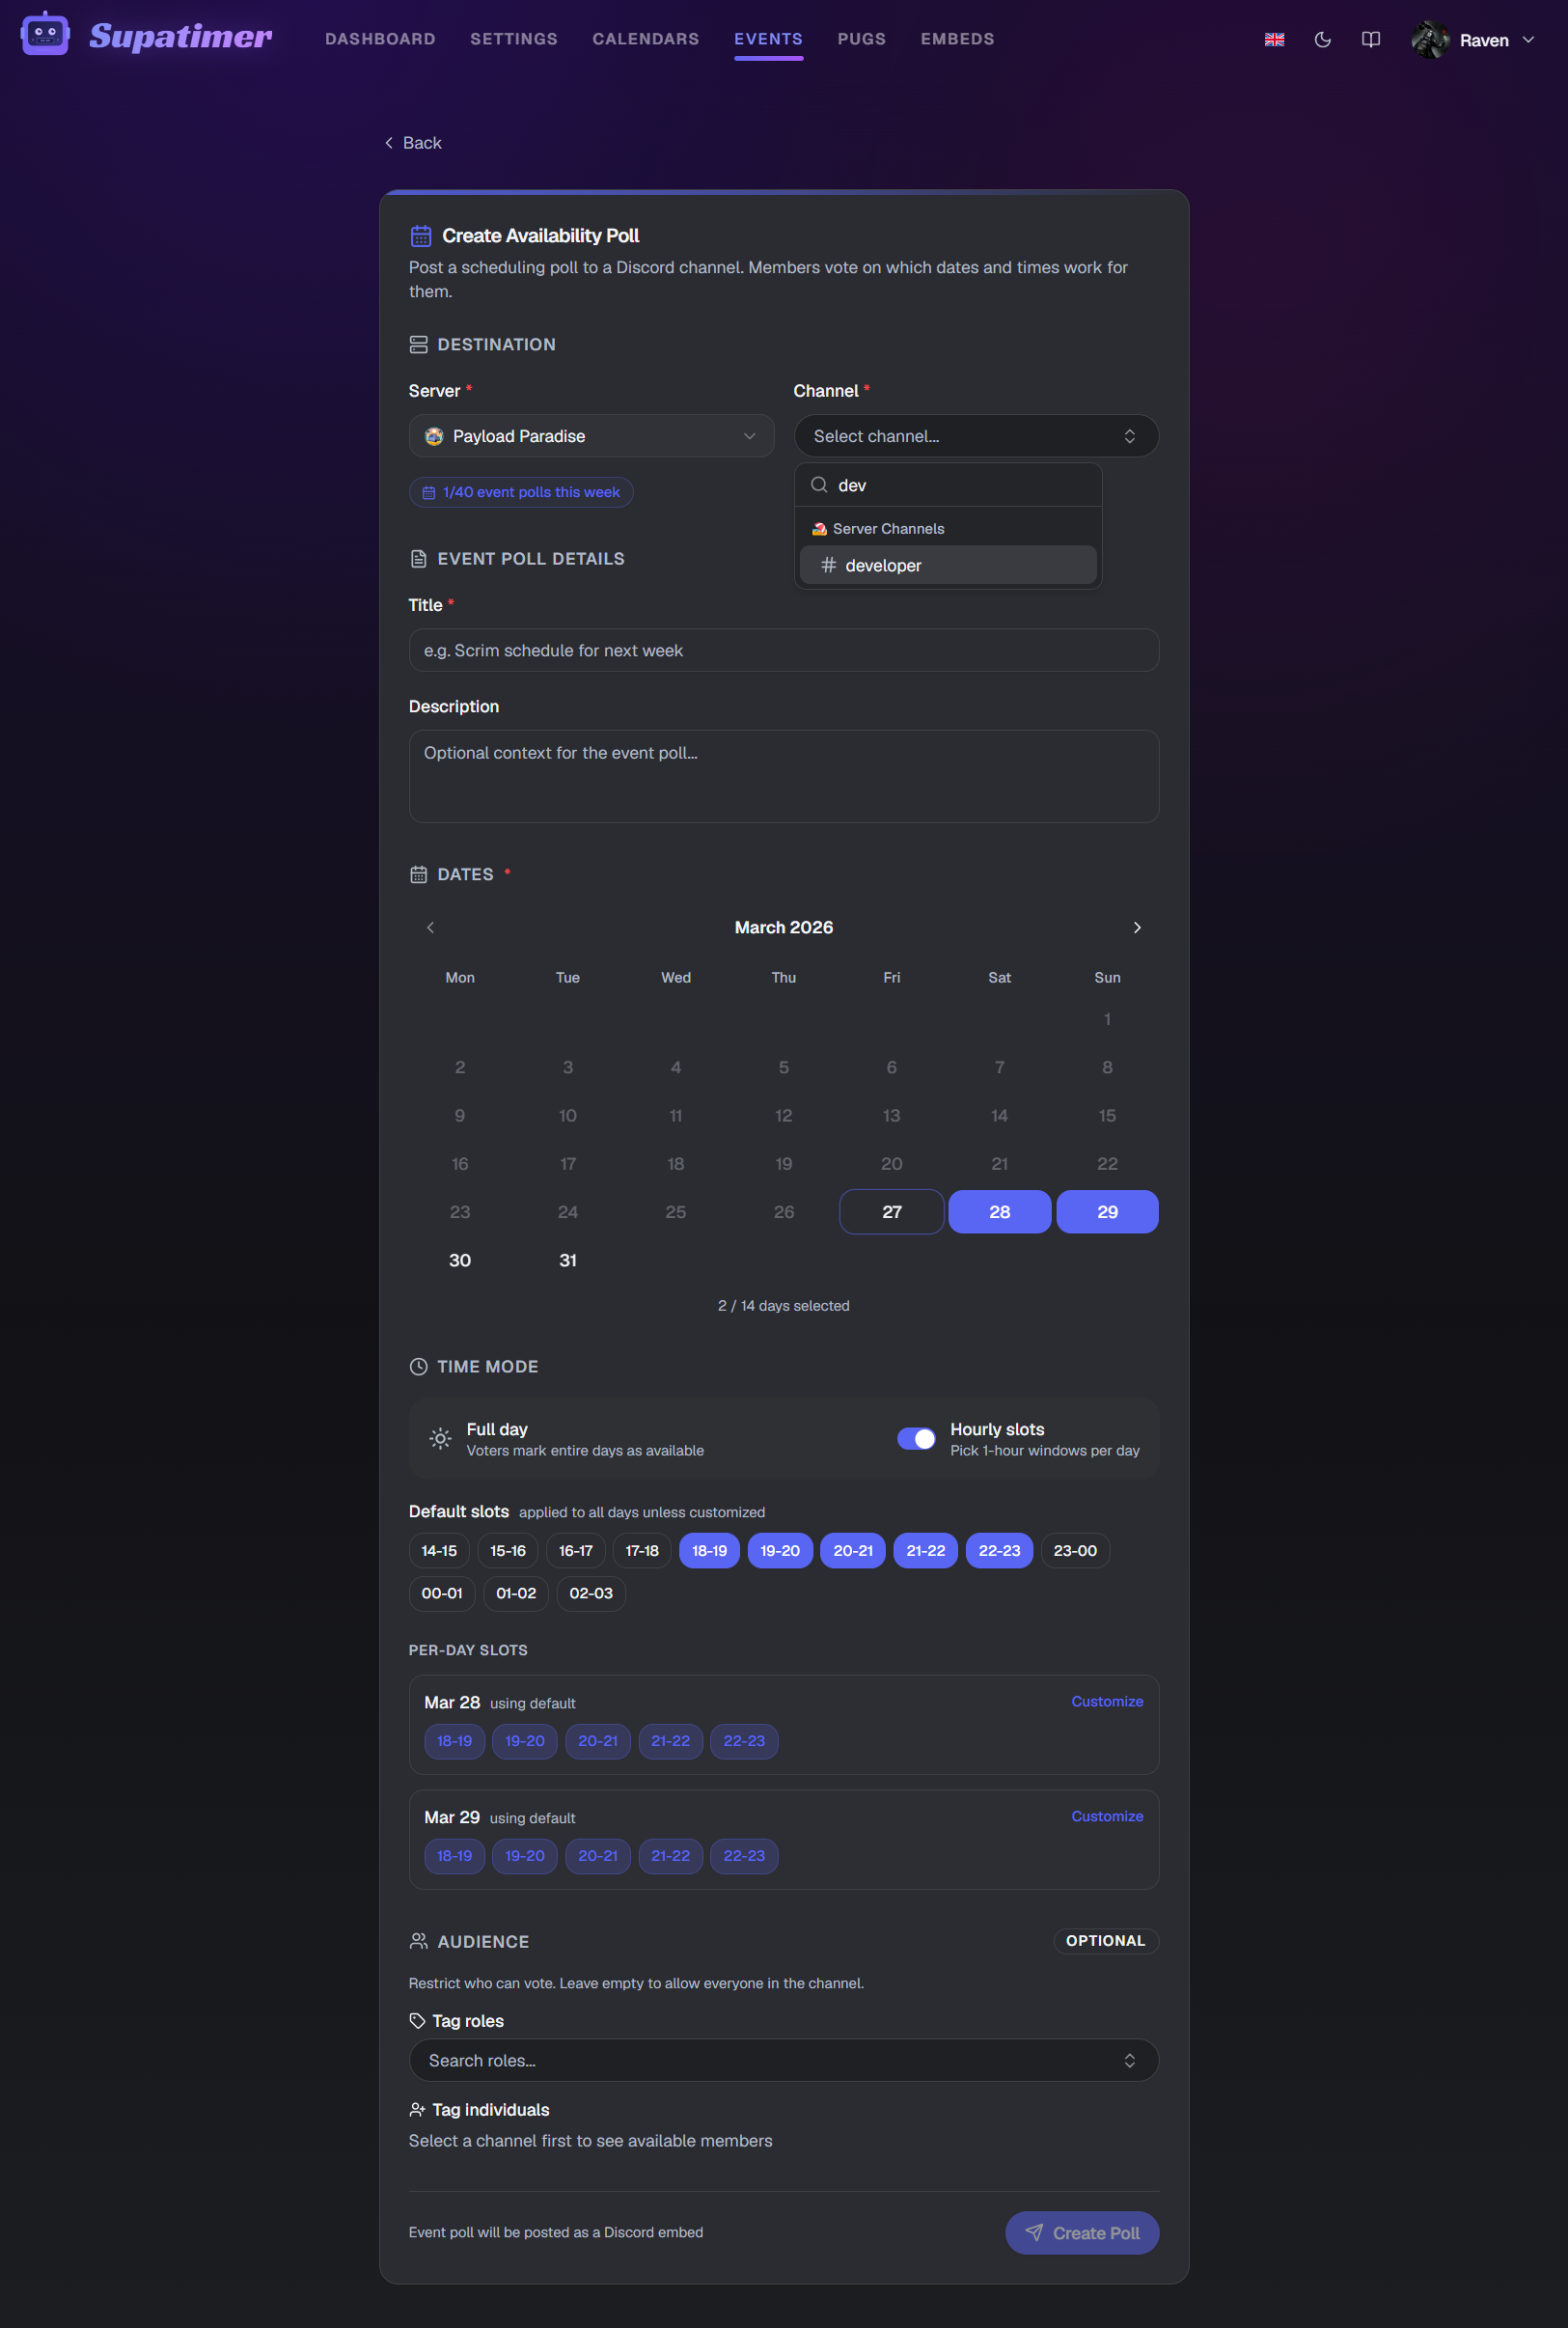
- 2Click 'Create Event' to start a new event. Set a title, options, and which server/channel to post in.
- 3Team members can vote directly on the web, or click 'Vote Now' on the Discord embed to open a personal menu with their available slots pre-selected.
- 4Click an event card to see the detail page with vote counts and who voted for what.
- 5Each server has an event quota shown as a badge (e.g. 3/5). When the quota is exceeded, new events are blocked until the weekly reset.
- 6On an event's detail page, click the eye icon on a voter's row to hide voters you don't need to see. A bar above the grid lists who you've hidden, so you can bring back one or everyone. It only changes your own view (saved in your browser) and never affects the vote counts.
Watch
Screenshots

PUGs Planner
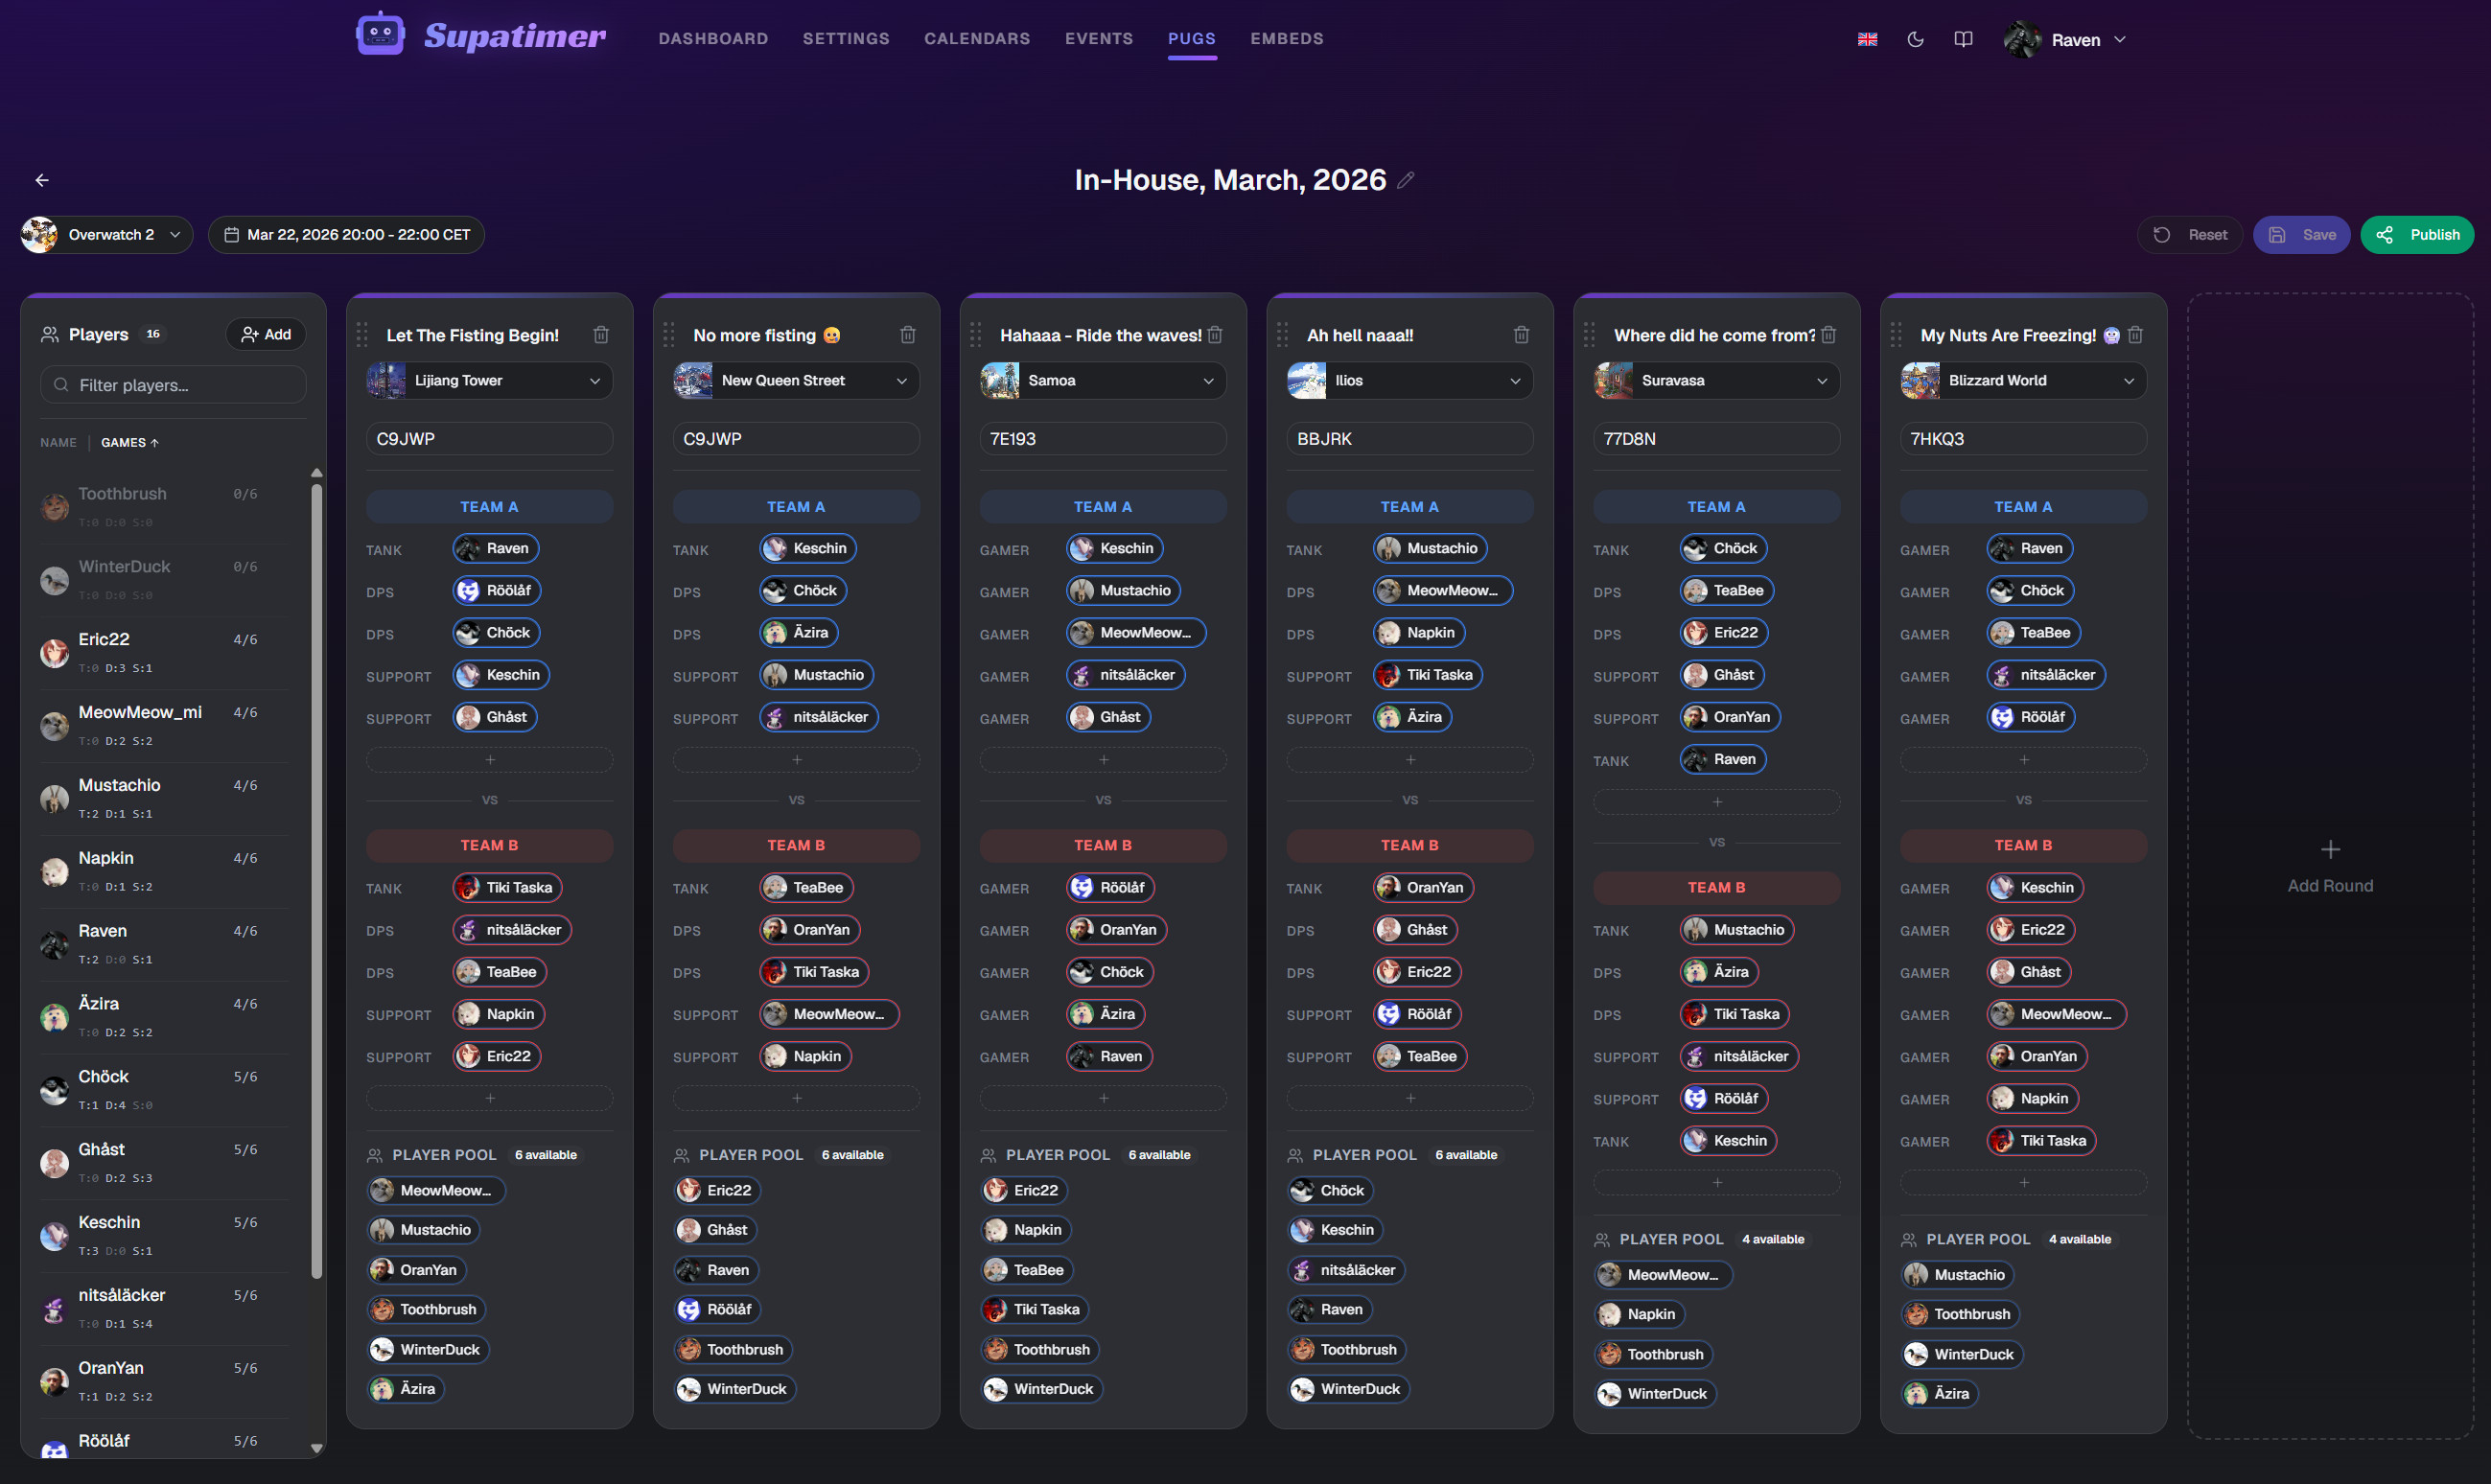
The PUGs Planner helps you organize pick-up game sessions. Build a roster from your server members, set up multiple rounds with role-based team slots, and share the result with your server.
How to use
- 1Navigate to 'PUGs Planner' from the Tools menu. You'll see your active and past PUG sessions grouped by server.
- 2Click 'Create PUG' to start a new session. Give it a name and optionally set a scheduled start and end time.
- 3Add players from your server to the session roster using the 'Add Players' dialog.
- 4Create rounds and assign players to team slots. Drag and drop players between roles (tank, DPS, support, flex) to build balanced teams.
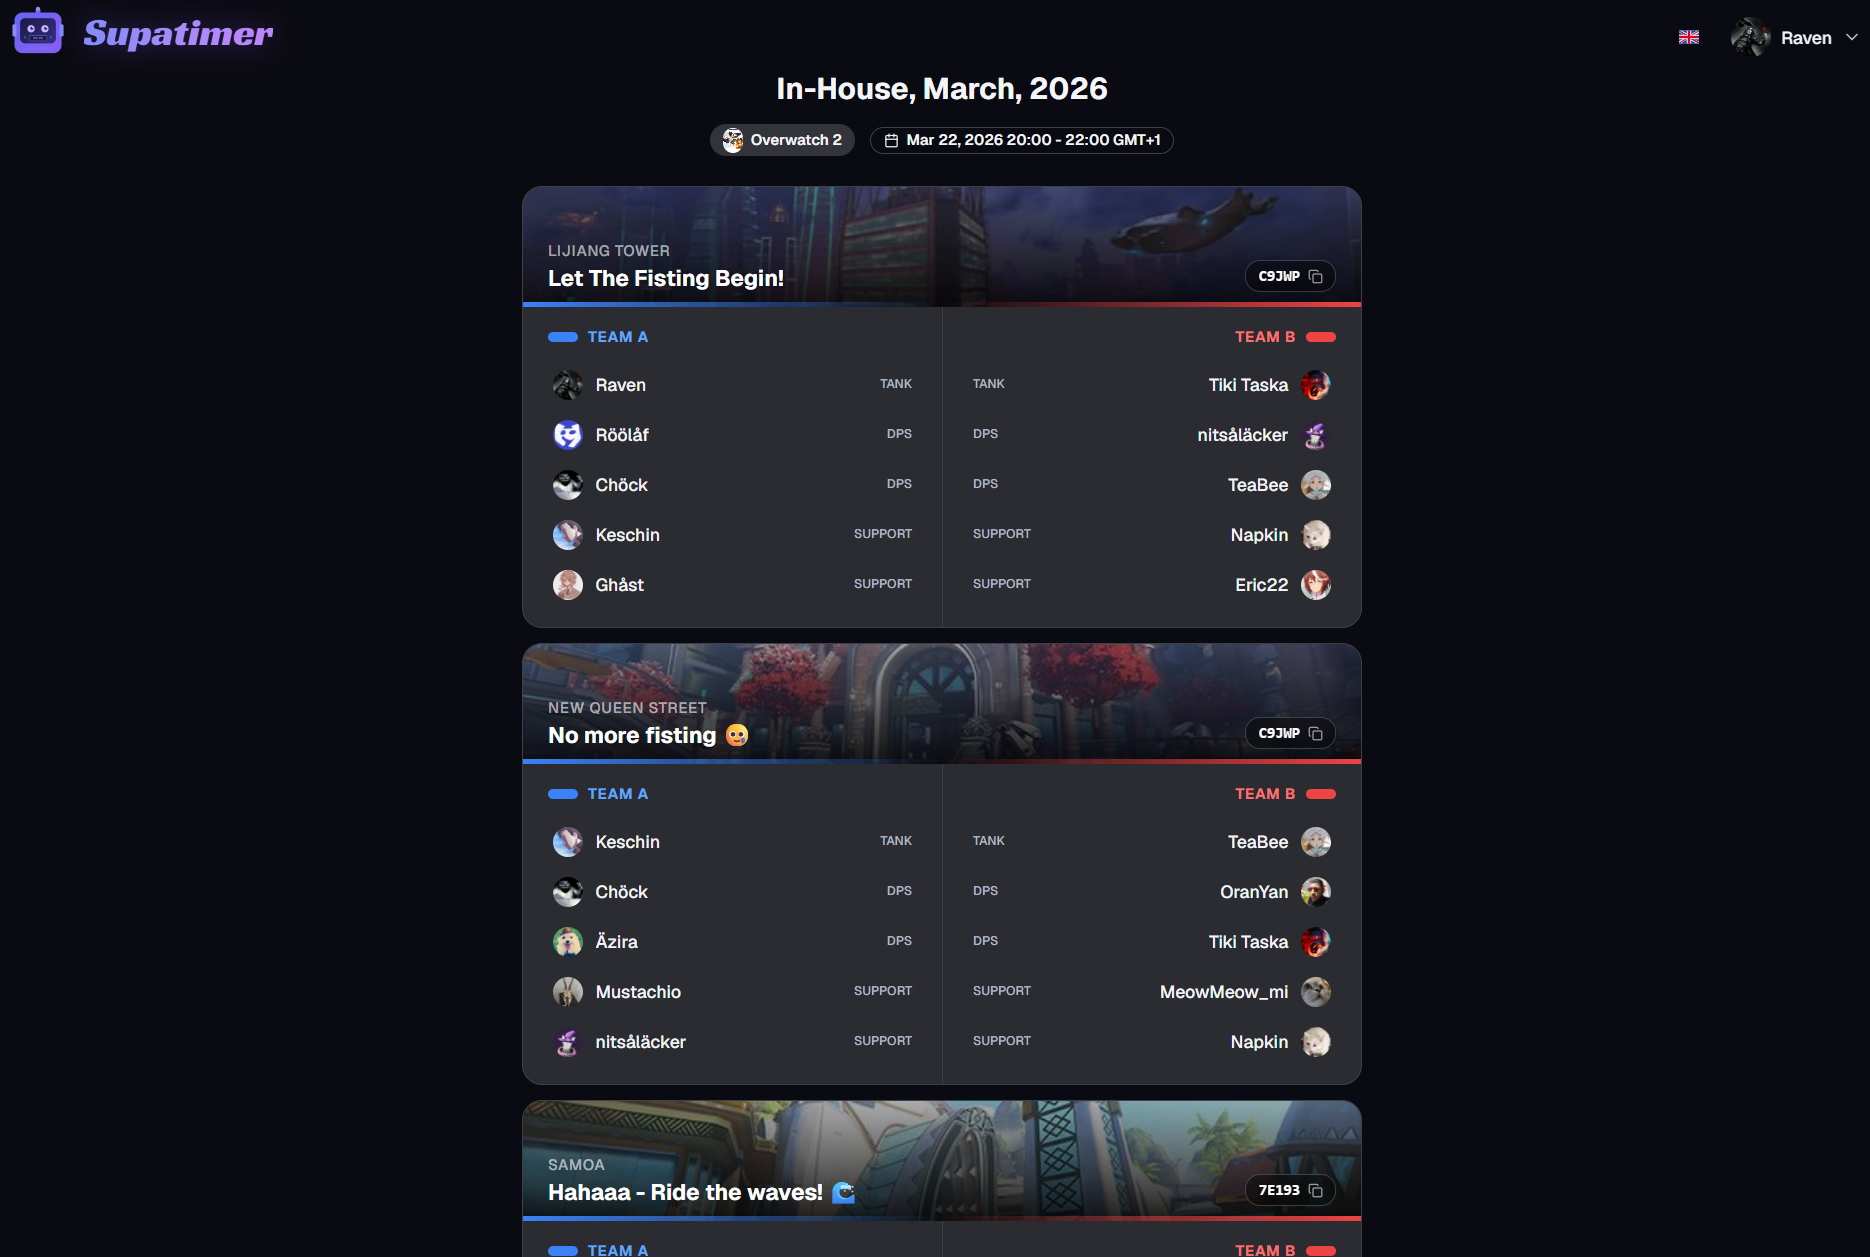
- 5Click the share button to generate a public link. Anyone with the link can view the session lineup without logging in.
- 6Use 'Post to Discord' to send an embed to a channel so your server knows the lineup is ready.
Screenshots

Settings
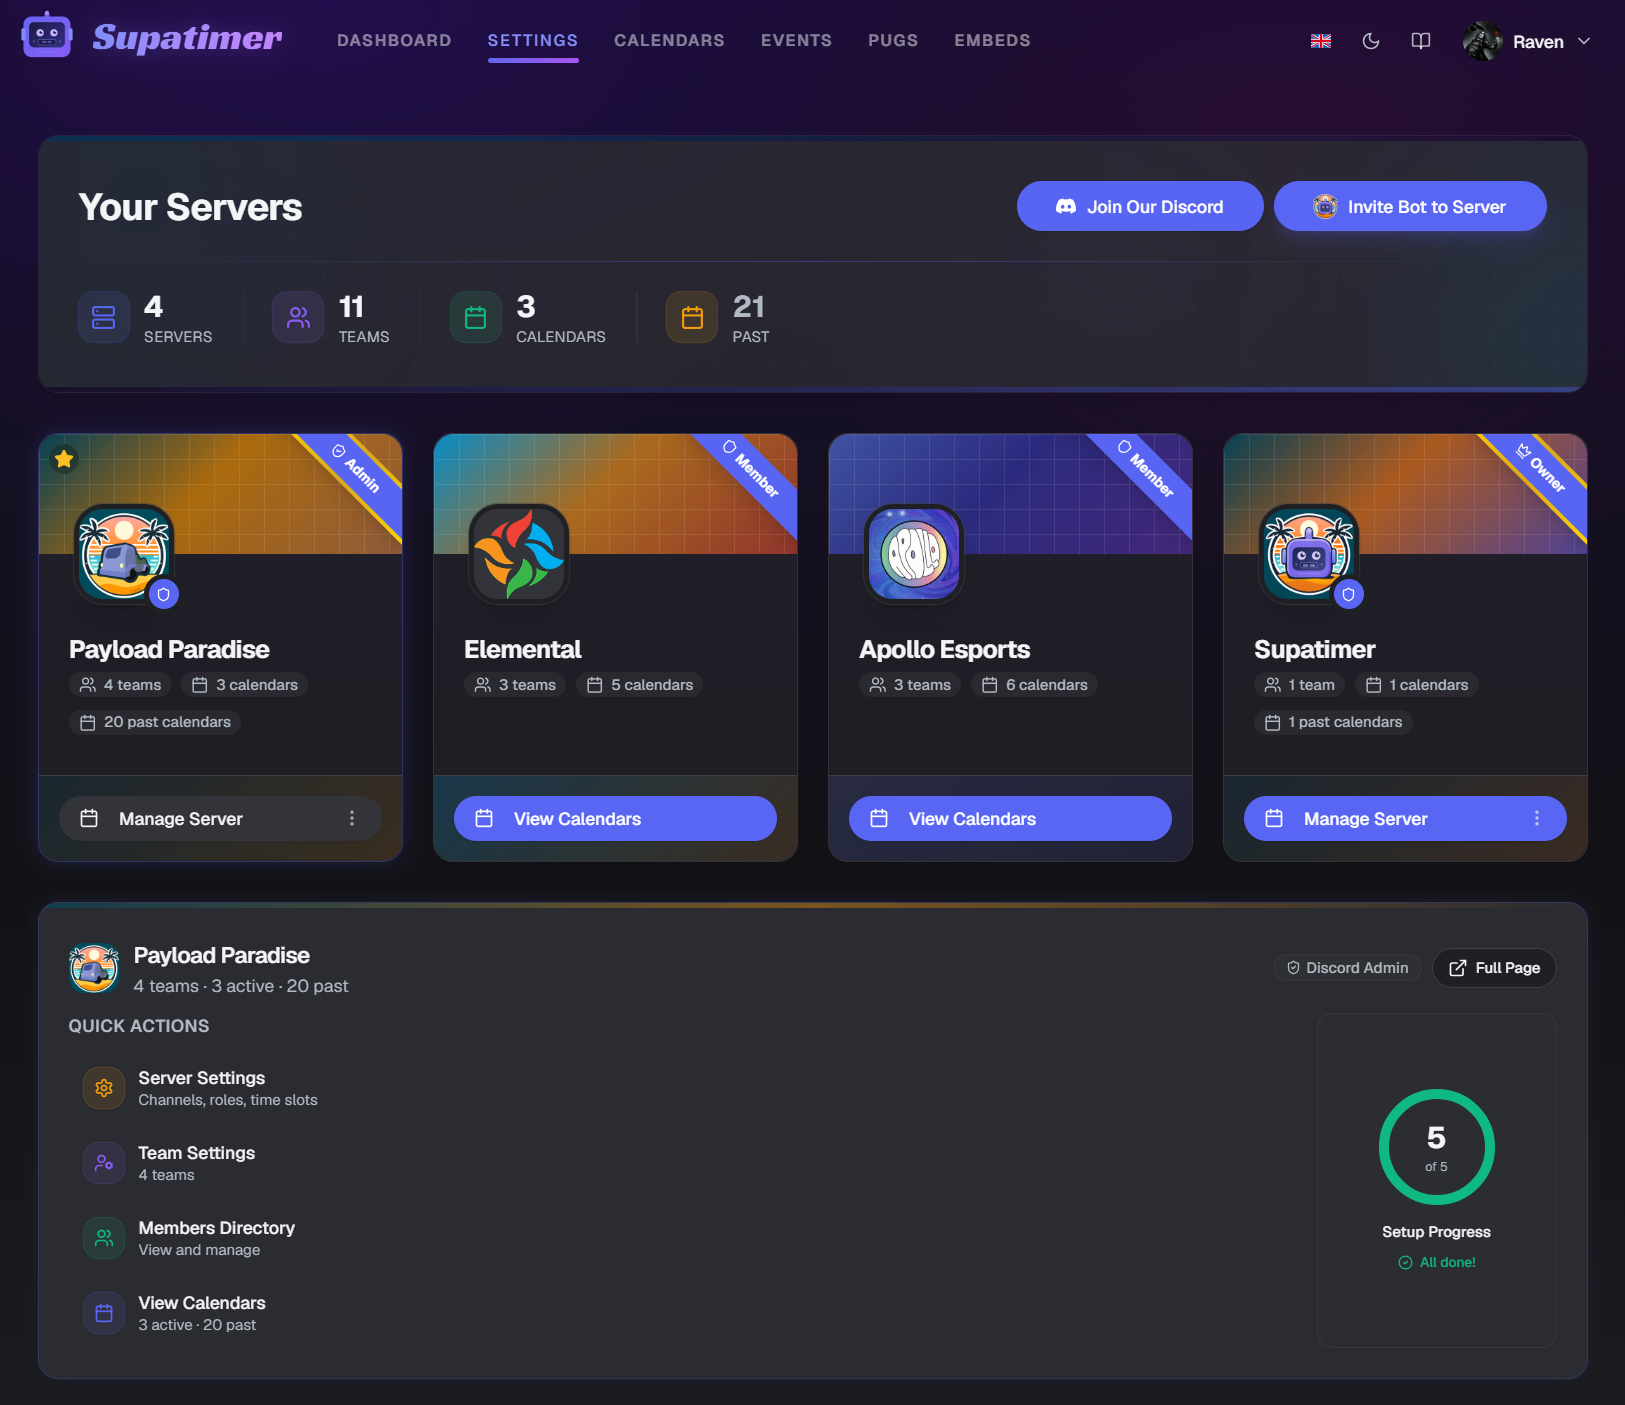
Settings lists every Discord server where you and the bot are both present. Pick a server to open its management areas. What you see depends on your role: everyone can view calendars; team managers and admins get additional tools.
Areas inside a server
- Server SettingsAdmin
Configure allowed channels, roles, time slots, and bot-wide options for this server. This is the web equivalent of /config.
- Team SettingsTeam Manager
Create and manage teams, channels, game selection, posting, ping roles, and scrim exchange info.
- Members DirectoryTeam Manager
Browse members and configure roster roles, player status, and lineup-related fields for teams you manage.
- View CalendarsEveryone
Browse active and past availability calendars for this server. Available to everyone who can see the server in Settings.
How to use
- 1Navigate to 'Settings' from the top nav. Each server card shows the server icon, name, and your access level.
- 2The header shows stats: total servers, teams, and active calendars across all servers.
- 3Click the star on a server card to favorite it. Favorited servers appear first.
- 4Click a server card to open that server. From there you can open View Calendars (everyone), Team Settings and Members Directory (team managers and above), and Server Settings (admins).
Watch
Screenshots
Absences
The absences system lets team members declare upcoming unavailability. Admins and team managers can see all absences for planning.
How to use
- 1Your absences appear in the 'My Absences' card on the Dashboard and Calendars page.
- 2Click 'Add' to create a new absence. Set the date range and an optional reason.
- 3Edit or delete existing absences by clicking on them in the list.
- 4Team managers see a 'Team Absences' card showing who on the team is unavailable and when.
- 5Absences are factored into calendar availability - days you're marked absent will show as unavailable.
Screenshots

Fun Commands
Supatimer includes lighthearted social commands you can use in any channel. Server admins can toggle each command on or off in Server Settings.
How to use
- 1Type /roast and pick a server member from the target option. The bot posts a random burn mentioning that player publicly in the channel.
- 2Roasts are randomly selected from over 700 lines - a mix of gaming and everyday humor. Each one starts with the target's @mention.
- 3Admins can disable /roast for a server in Server Settings under Fun Commands. When disabled, anyone who tries the command gets a notice.
- 4New servers have /roast enabled by default. Toggle it off any time if you prefer a more serious atmosphere.
Admin & Team Management
Members Directory
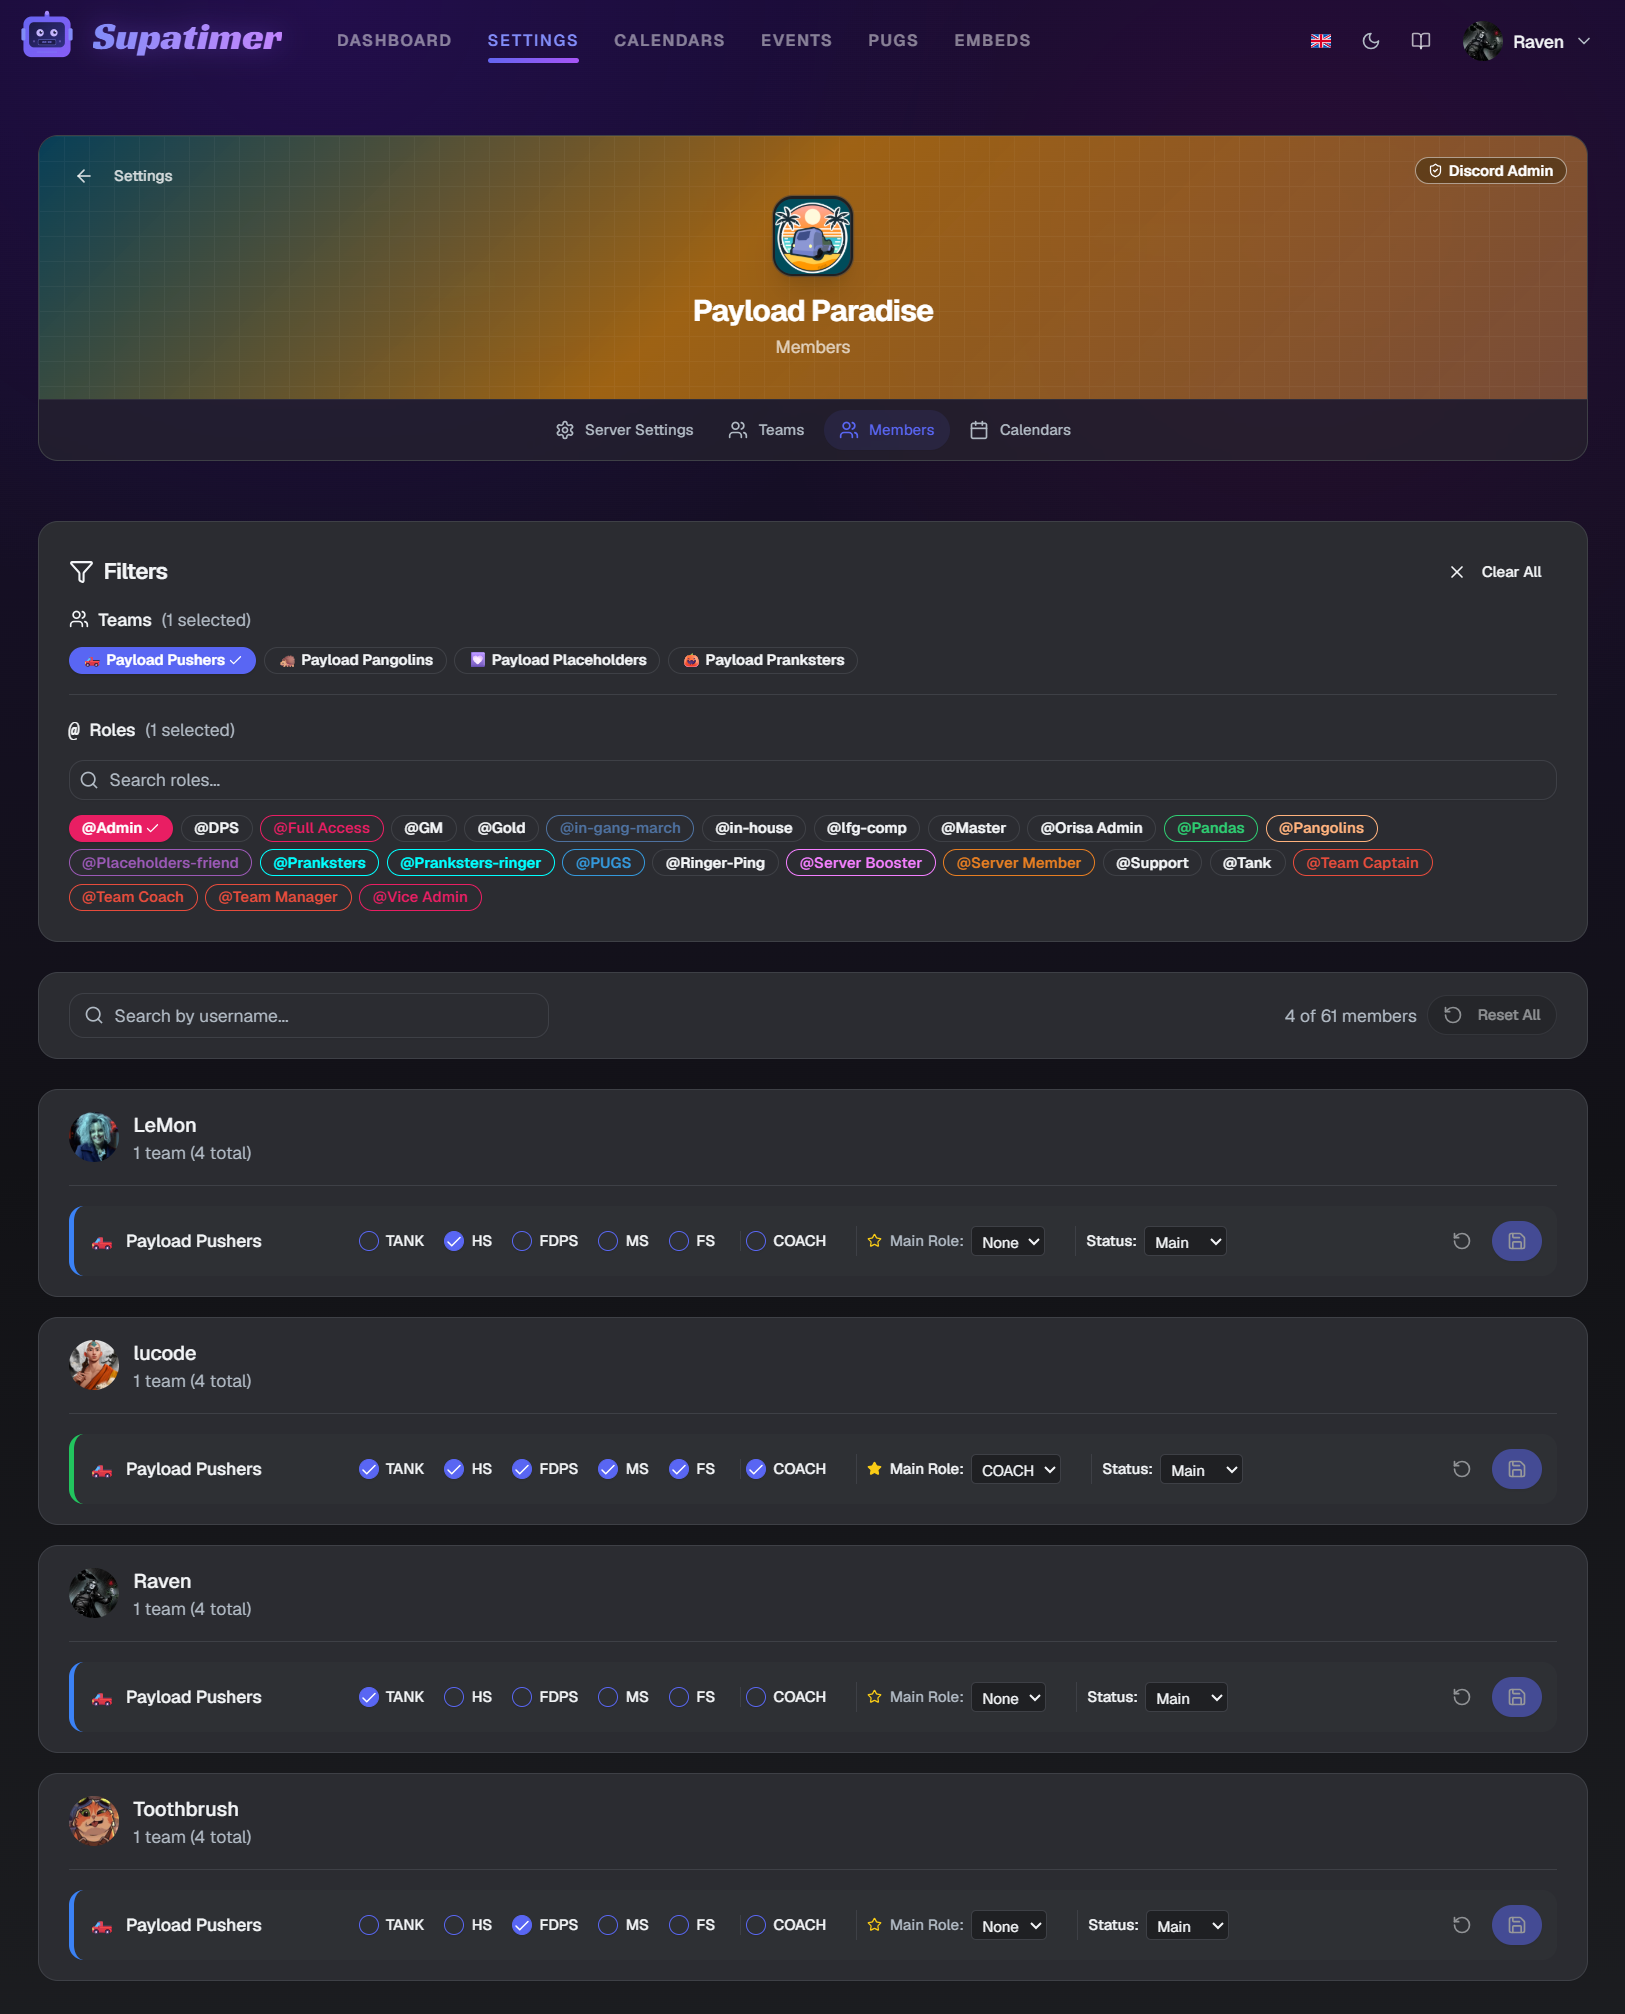
The Members Directory lets team managers and admins configure each Discord member's in-game roles and status. This data drives the bot's automatic lineup generation and weekly preliminary features.
How to use
- 1Open Settings from the top nav, select a server, then open Members Directory. You'll see all members grouped by team channel.
- 2Each member row has checkboxes for game-specific roles. Overwatch teams show Tank, HS, FDPS, MS, FS. Other role-structured games show their own roles (e.g. Vanguard, Duelist, Strategist for Marvel Rivals). Headcount games like Apex skip role checkboxes entirely.
- 3Set each member's player status using the dropdown: Main, Tryout, Sub, Ringer, or Coach. Coaches can track availability but are excluded from lineups and player counts.
- 4Select a primary role for each member - this is used when auto-generating lineups.
- 5Use the filter bar to search by name, filter by Discord role, or filter by team.
- 6Click 'Copy from above' to quickly duplicate role assignments from the previous channel section.
- 7Changes are not saved automatically. Click the floating 'Save' button at the bottom to save all changes at once.
Watch
Screenshots


Note: Configuring members is essential for the /weekplan command and automatic lineup generation. Without role assignments, the bot cannot create preliminary lineups.
Team Settings
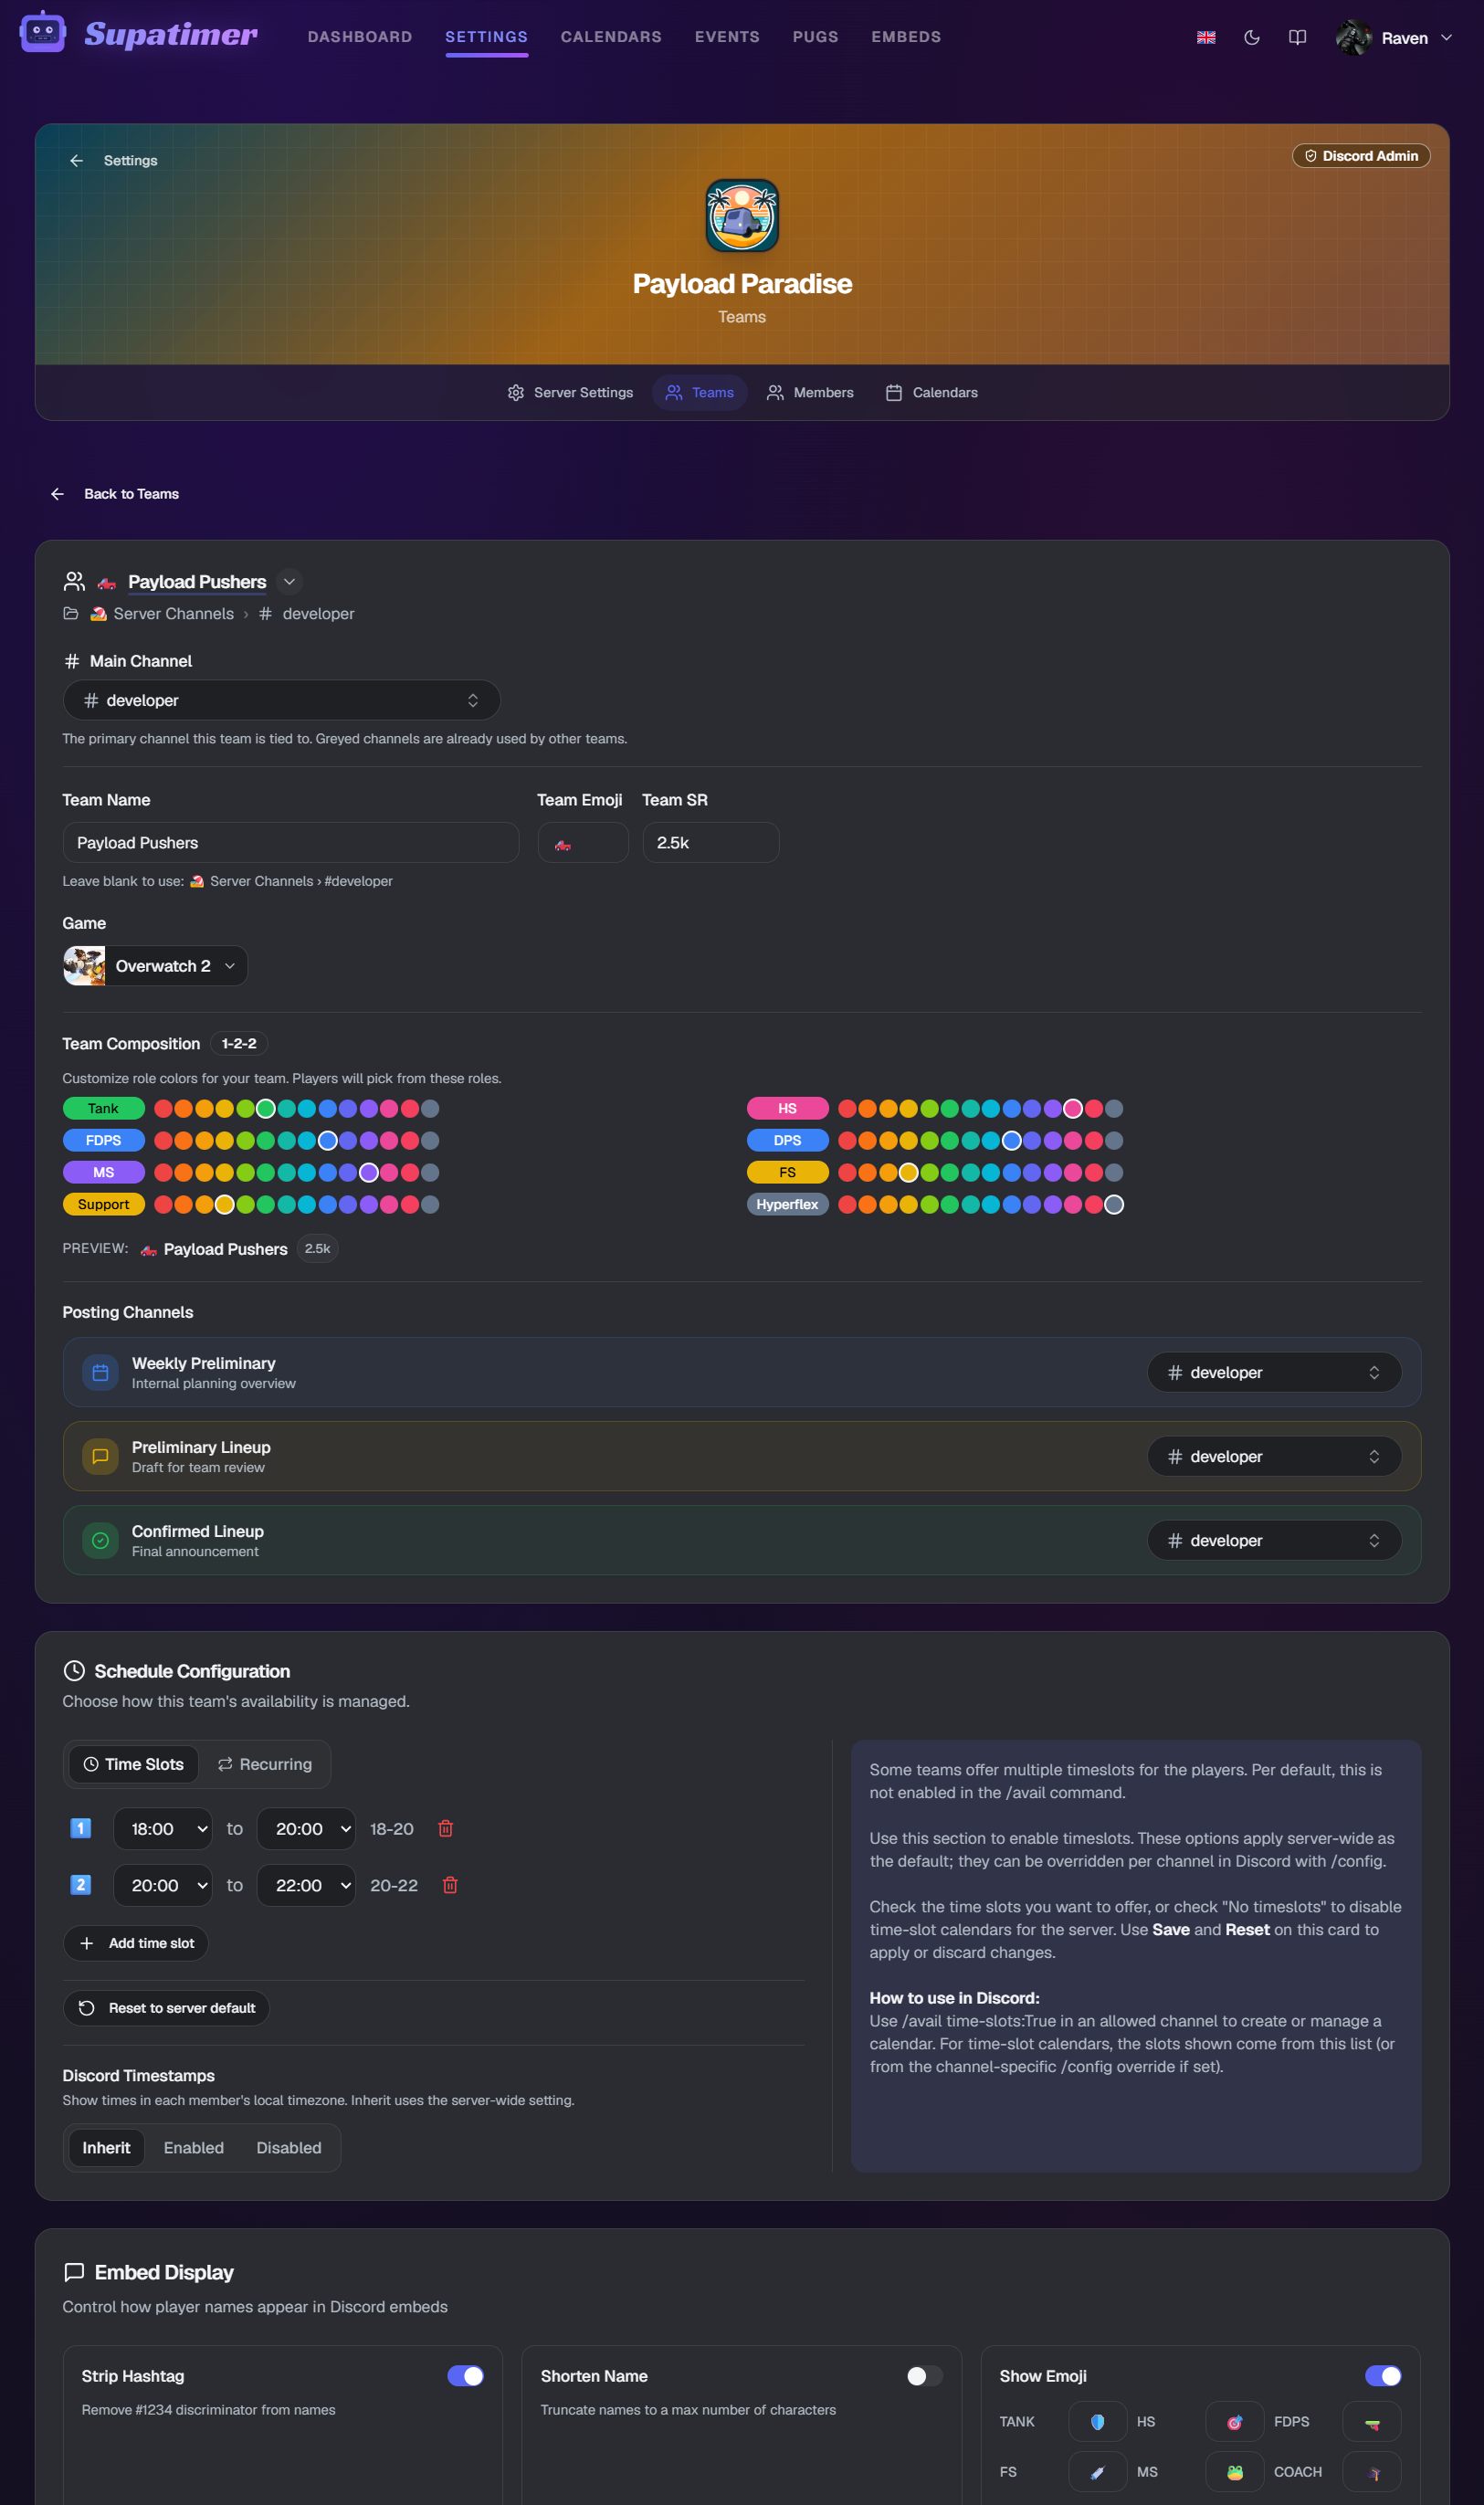
Teams group your members and link to Discord channels. Each team has a name, SR range, posting channels, and notification roles.
How to use
- 1Open Settings from the top nav, select a server, then open Team Settings. You'll see cards for each team.
- 2Each team card shows the team name, SR/rank, and a configuration status badge (configured or not configured). Admins get an Add team button here - pick the channel the team lives in and you go straight to its settings.
- 3Click a team card to open its settings. Configure the team name, SR range, and associated channels.
- 4Select a game for your team using the Game picker. This controls team size, role structure, and how the availability grid and weekly prelims display. If your server supports multiple games, each team can play a different game.
- 5The Team Composition section shows your game's format (e.g. 2-2-2 for Marvel Rivals, headcount for Apex). For role-structured games, customize role colors by clicking the color circles next to each role.
- 6Set posting channels to control where the bot posts calendars, lineups, and scrim confirmations.
- 7Set ping roles to control which Discord roles get notified when the bot posts.
- 8Override Discord Timestamps per team - choose Inherit (use the server-wide setting), Enabled, or Disabled. This lets different teams have independent local timezone display.
- 9Configure Scrim Exchange Info (staggers, kill cam, hero bans, host) - these settings are shared when arranging scrims with other teams. Use the show/hide checkbox on each row to control visibility.
- 10Set up a Map Pool for Overwatch teams - select which maps your team plays per mode. The map pool is included in scrim exchange info copy buttons on lineup posts.
- 11Share scrim exchange info publicly - use the Share button in the Discord Actions bar to generate a link anyone can view without logging in. Pick the day and detail level, then copy the link to paste in LFG channels or DMs.
- 12Delete a team from the Danger zone at the bottom of its settings - type delete to confirm. This frees up the team's channel and removes its settings; calendars it already posted are left alone. Admins only.
- 13Set a Timezone for the team on the Schedule Configuration card. Inherit follows the server's timezone (the default); pick a zone to override it, which is useful when your teams are not all in the same region. Daylight Saving is handled automatically either way.
Watch
Screenshots
Server Settings
Server Settings is where admins configure which Discord channels and roles the bot can use. This is the web equivalent of the /config command.
How to use
- 1Open Settings from the top nav, select a server, then open Server Settings. Each setting is displayed as a card.
- 2Allowed Channels - Select which Discord channels the bot can post calendars and embeds in.
- 3Allowed Roles - Select which Discord roles can use bot commands and respond to calendars.
- 4Admin Roles - Select which Discord roles have admin-level access to the bot.
- 5Time Slots - Configure the available time slots for each channel (e.g. '20:00', '21:00').
- 6Discord Timestamps - Enable this to show times in each member's local timezone using Discord's dynamic timestamp format. When enabled, times like '20:00' appear converted to the viewer's own timezone.
- 7Each card has an info button explaining what the setting does.
Watch
Note: For first-time setup, the /setup command in Discord provides a guided wizard that covers the same settings.
Getting Started
Getting Started
The onboarding flow walks you through setting up Supatimer for the first time. It covers channel configuration, team setup, and member management.
How to use
- 1When you first add the bot to a server, a getting started checklist appears on the Settings page for that server.
- 2The checklist guides you through: configuring channels, posting your first calendar, setting up teams, and configuring members in Settings.
- 3You can also start the guided tour from the welcome banner by clicking 'Take the tour'.
- 4The tour highlights each part of the dashboard with step-by-step explanations.
- 5You can skip steps and come back later - the checklist tracks your progress.
- 6Already completed steps are automatically marked as done.
Watch
Need help? Join our Discord server or check the Discord Bot Commands reference.