Web-Anleitung
Anleitung fuer jede Funktion des Supatimer Web-Dashboards. Jeder Abschnitt enthaelt Schritt-fuer-Schritt-Anleitungen.
Video-Tour
Schau dir den 7-minuetigen Rundgang an, der Bot-Einrichtung, Teamkonfiguration und alle wichtigen Funktionen abdeckt.
Kapitel
Fragen oder Feedback? Tritt unserer Discord-Community bei fuer Hilfe.
Discord beitretenFunktionen
Dashboard-Uebersicht
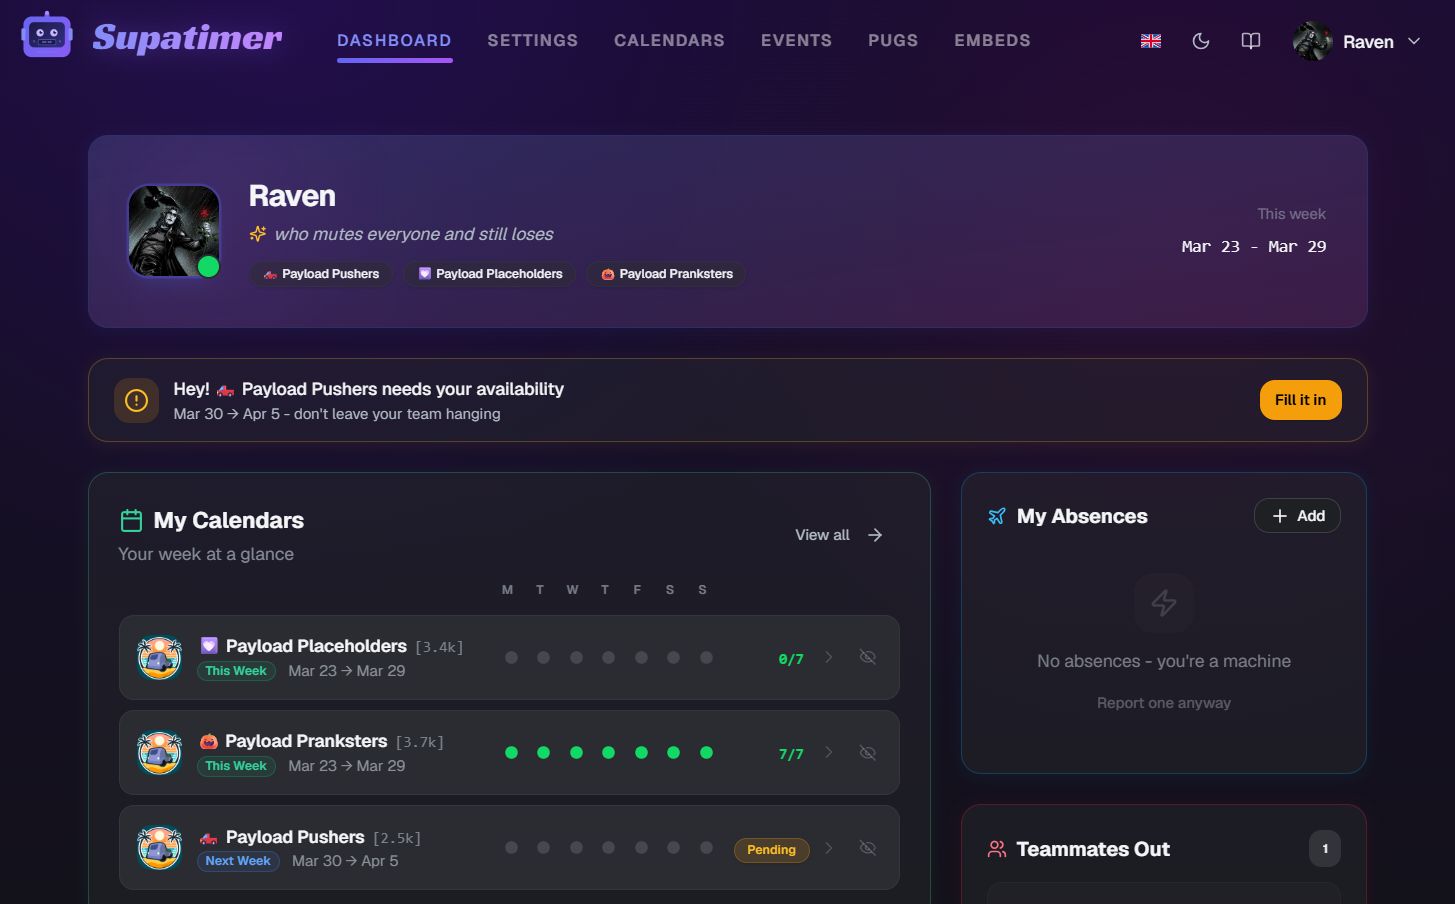
Das Dashboard ist deine Homebase. Es zeigt aktive Kalender, kommende Scrims, aktuelle Ergebnisse und Abwesenheiten auf einen Blick.
Anleitung
- 1Oben siehst du ein Aktionsbanner, wenn Kalender deine Antwort brauchen. Klicke darauf, um direkt zum Kalender zu springen.
- 2Der Bereich 'Meine Kalender' listet jeden Teamkalender auf, dem du angehoerst.
- 3Der Bereich 'Kommende Aktivitaeten' zeigt bestaetigte Scrims, vorlaeufige Lineups und andere Aktivitaeten.
- 4Der Bereich 'Letzte Scrims' zeigt vergangene Ergebnisse. Filtere nach allen Teams oder nur deinen.
- 5Die rechte Seitenleiste hat Schnellzugriffskarten: Meine Abwesenheiten, Meine Berechtigungen und Umfrageanfragen.
Ansehen
Screenshots
Kalender
Woechentliche Verfuegbarkeitskalender werden vom Bot in Discord gepostet und sind im Web sichtbar.
Anleitung
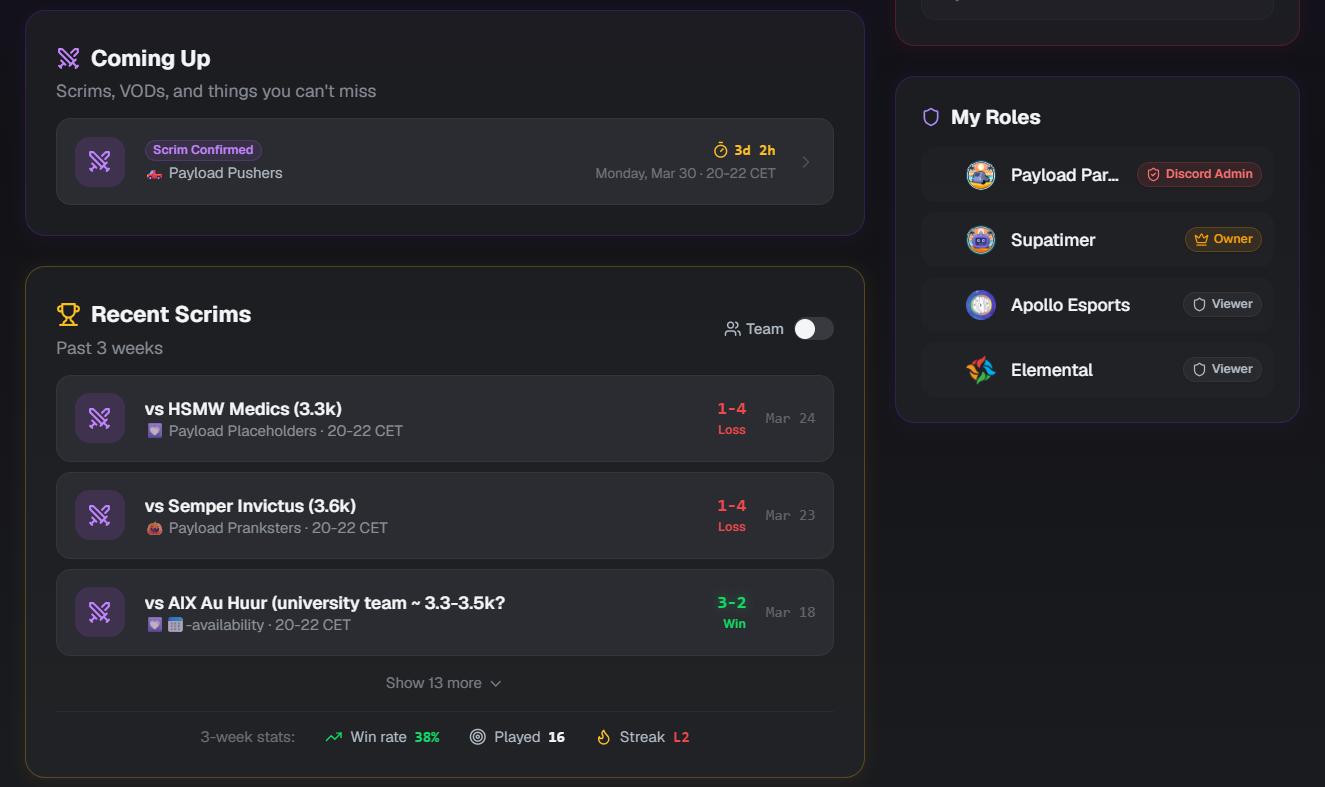
- 1Navigiere zu 'Kalender' im oberen Menue. Kalender sind nach Server gruppiert, aktive zuerst.
- 2Jede Kalenderkarte zeigt den Teamnamen, Zeitraum und eine Zusammenfassung der Antworten.
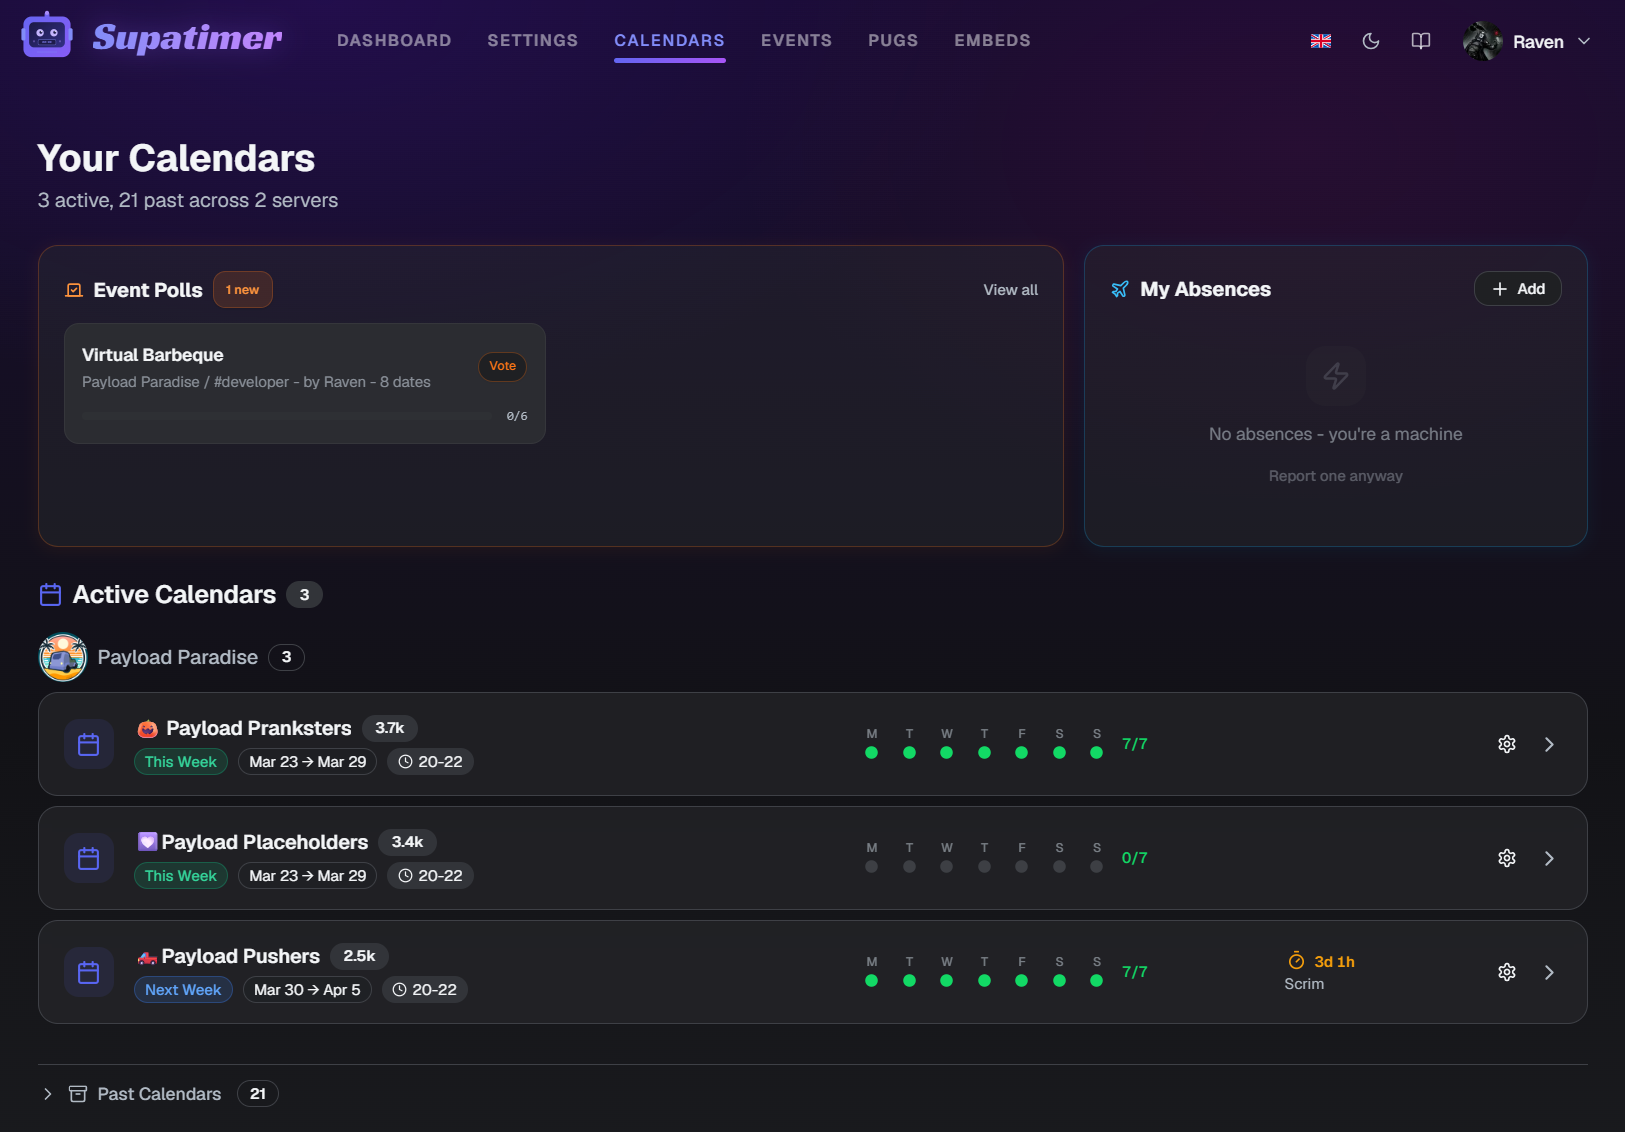
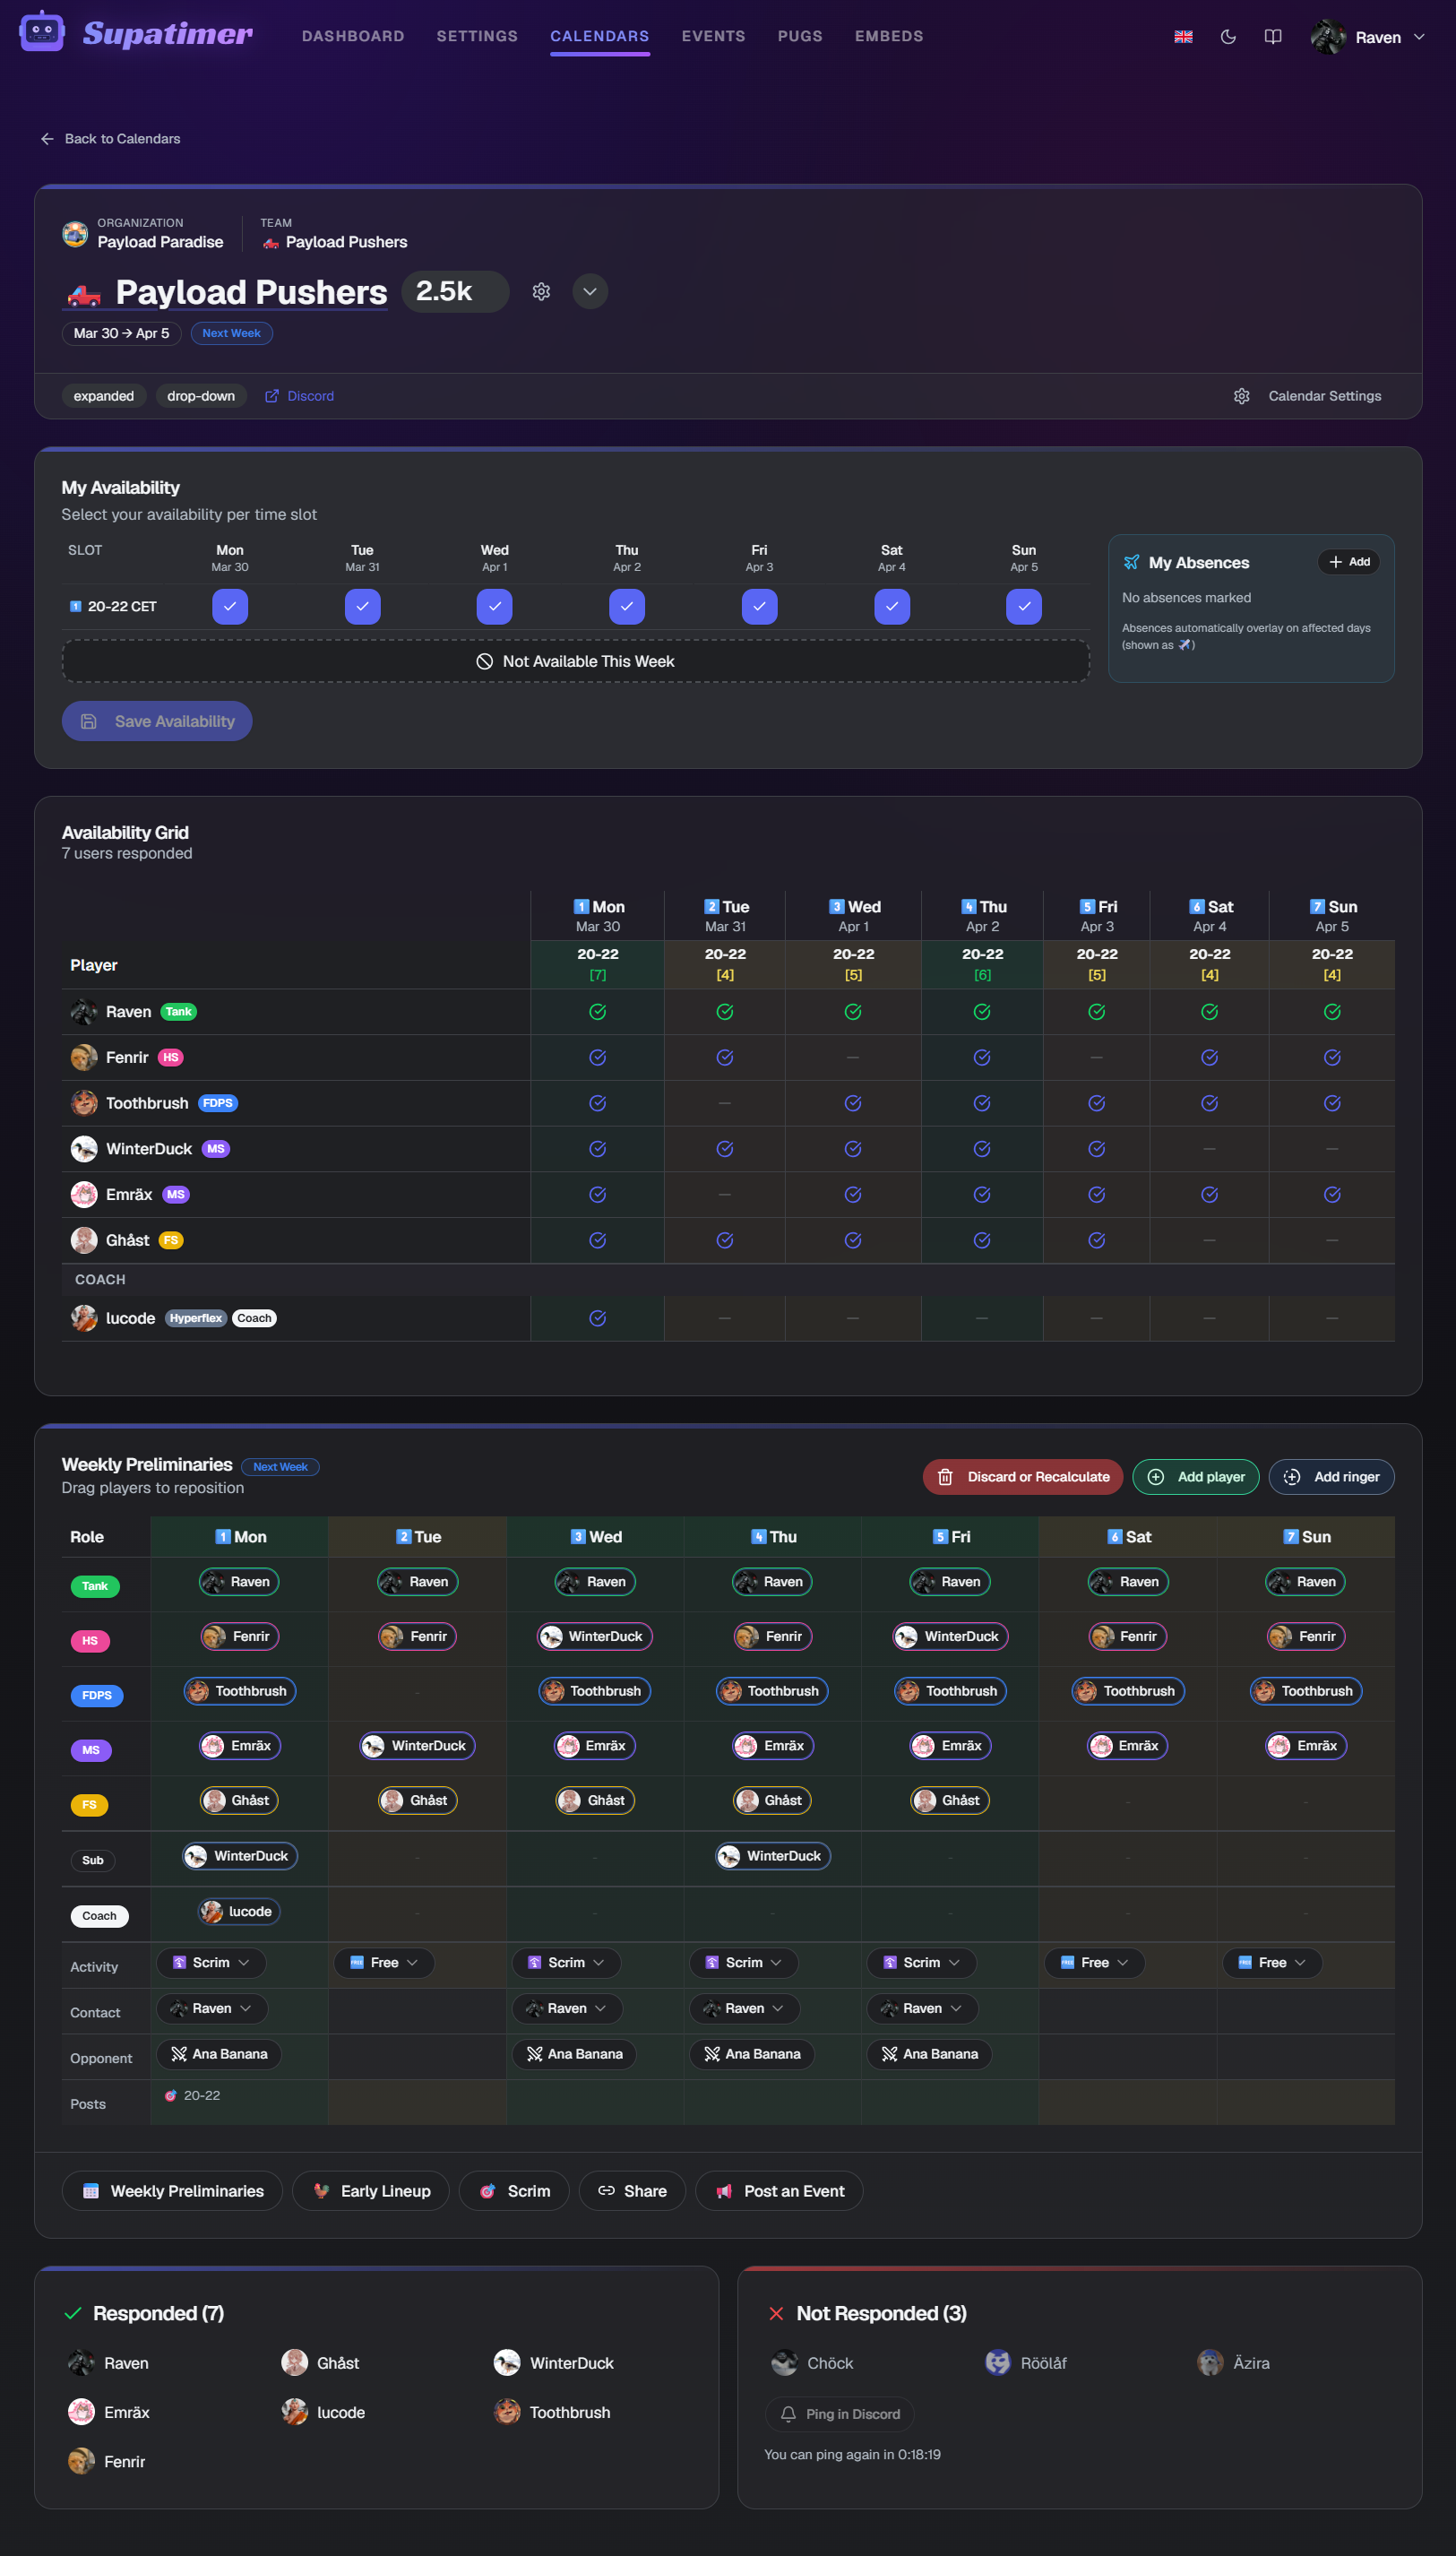
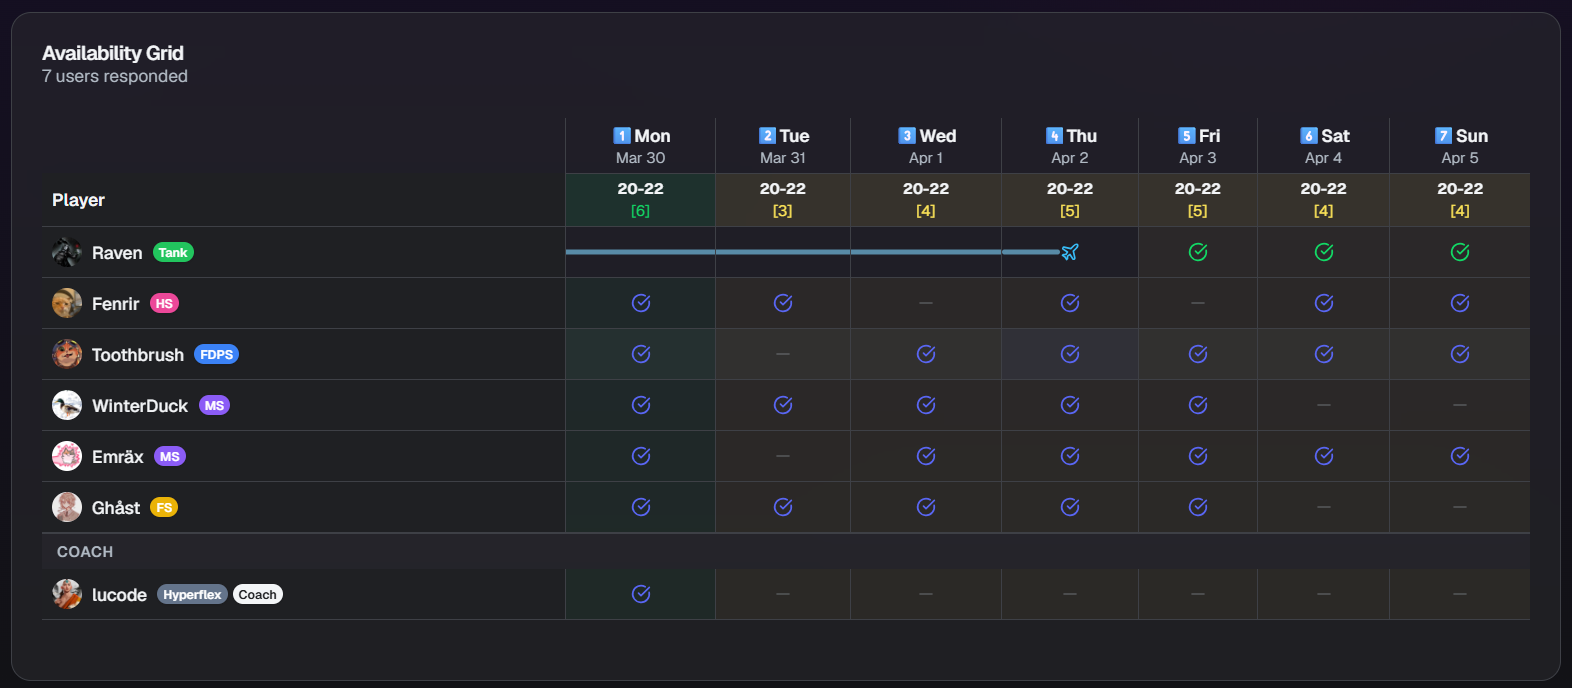
- 3Klicke auf eine Karte, um die Detailansicht mit dem vollstaendigen Verfuegbarkeitsraster zu oeffnen.
- 4Die Verfuegbarkeitspunkte zeigen einen schnellen visuellen Mo-So-Status: gefuellt = geantwortet, leer = ausstehend.
- 5Vergangene Kalender sind unten eingeklappt. Klicke zum Aufklappen.
- 6Oeffne die Einstellungen eines Kalenders (das Zahnrad auf der Kalenderseite), um Ping-Rollen und Zeitplan zu aendern. Team-Manager finden dort auch die Post-Nachrichten, Discord-Namen und Kalender-/Post-Layouts des Teams - dieselben Karten wie in den Teameinstellungen.
Ansehen
Screenshots
Event-Planer
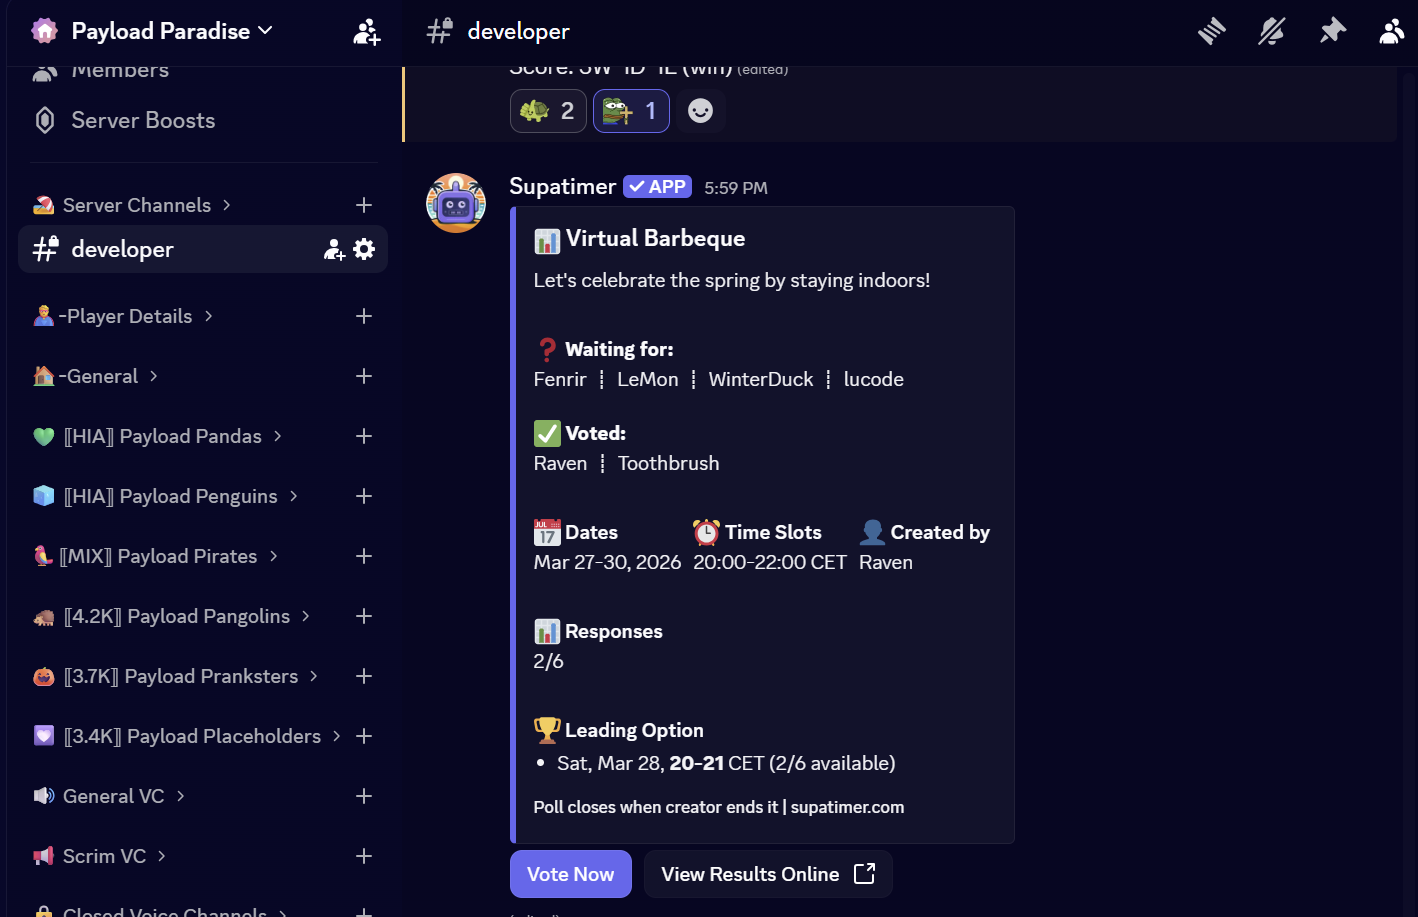
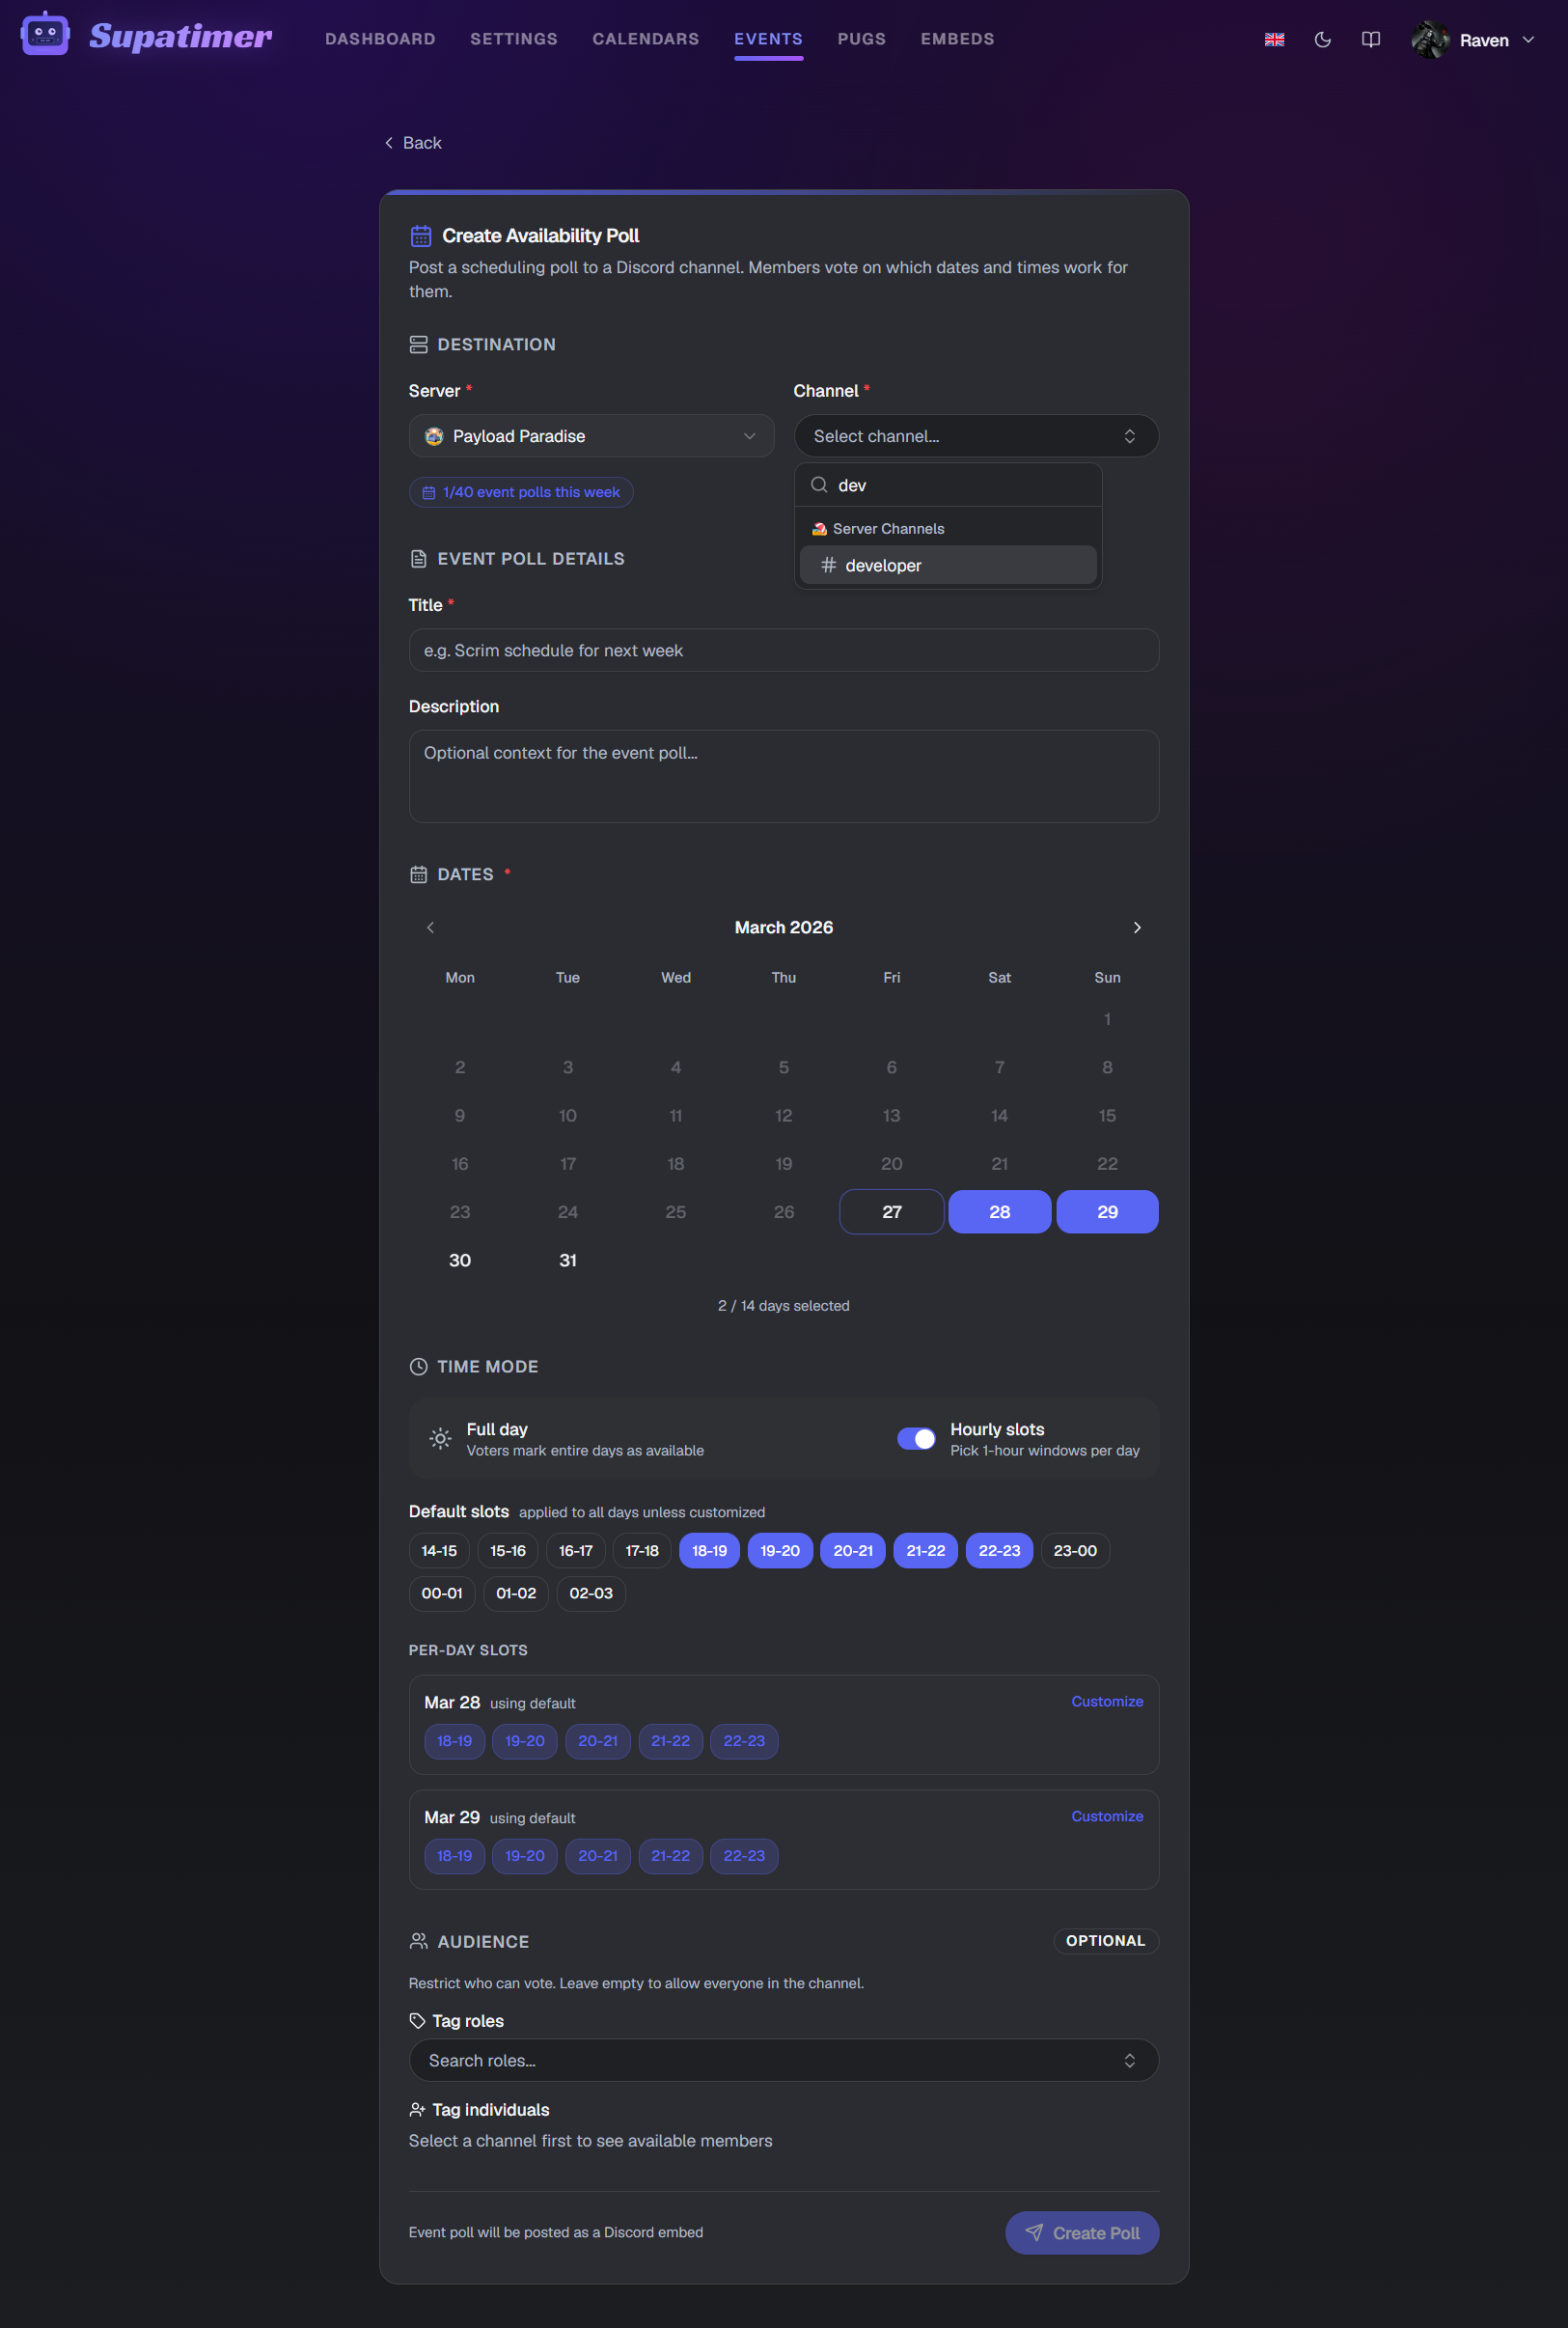
Im Event-Planer koennen Admins Fragen stellen und Stimmen sammeln. Umfragen erscheinen in Discord und im Web.
Anleitung
- 1Navigiere zu 'Event-Planer'. Umfragen sind nach Status gruppiert: offen, geschlossen und vergangen.
- 2Klicke 'Umfrage erstellen', um eine neue zu starten.
- 3Teammitglieder koennen direkt im Web abstimmen oder 'Jetzt abstimmen' auf dem Discord-Embed klicken.
- 4Klicke auf eine Umfragekarte, um Details und Ergebnisse zu sehen.
- 5Jeder Server hat ein Umfragekontingent als Badge (z.B. 3/5).
- 6Auf der Detailseite einer Umfrage klicken Sie auf das Augensymbol in der Zeile eines Abstimmenden, um Abstimmende auszublenden, die Sie nicht sehen müssen. Eine Leiste über dem Raster zeigt, wen Sie ausgeblendet haben, sodass Sie einzelne oder alle wieder einblenden können. Das ändert nur Ihre eigene Ansicht (im Browser gespeichert) und wirkt sich nie auf die Stimmenzahl aus.
Ansehen
Screenshots

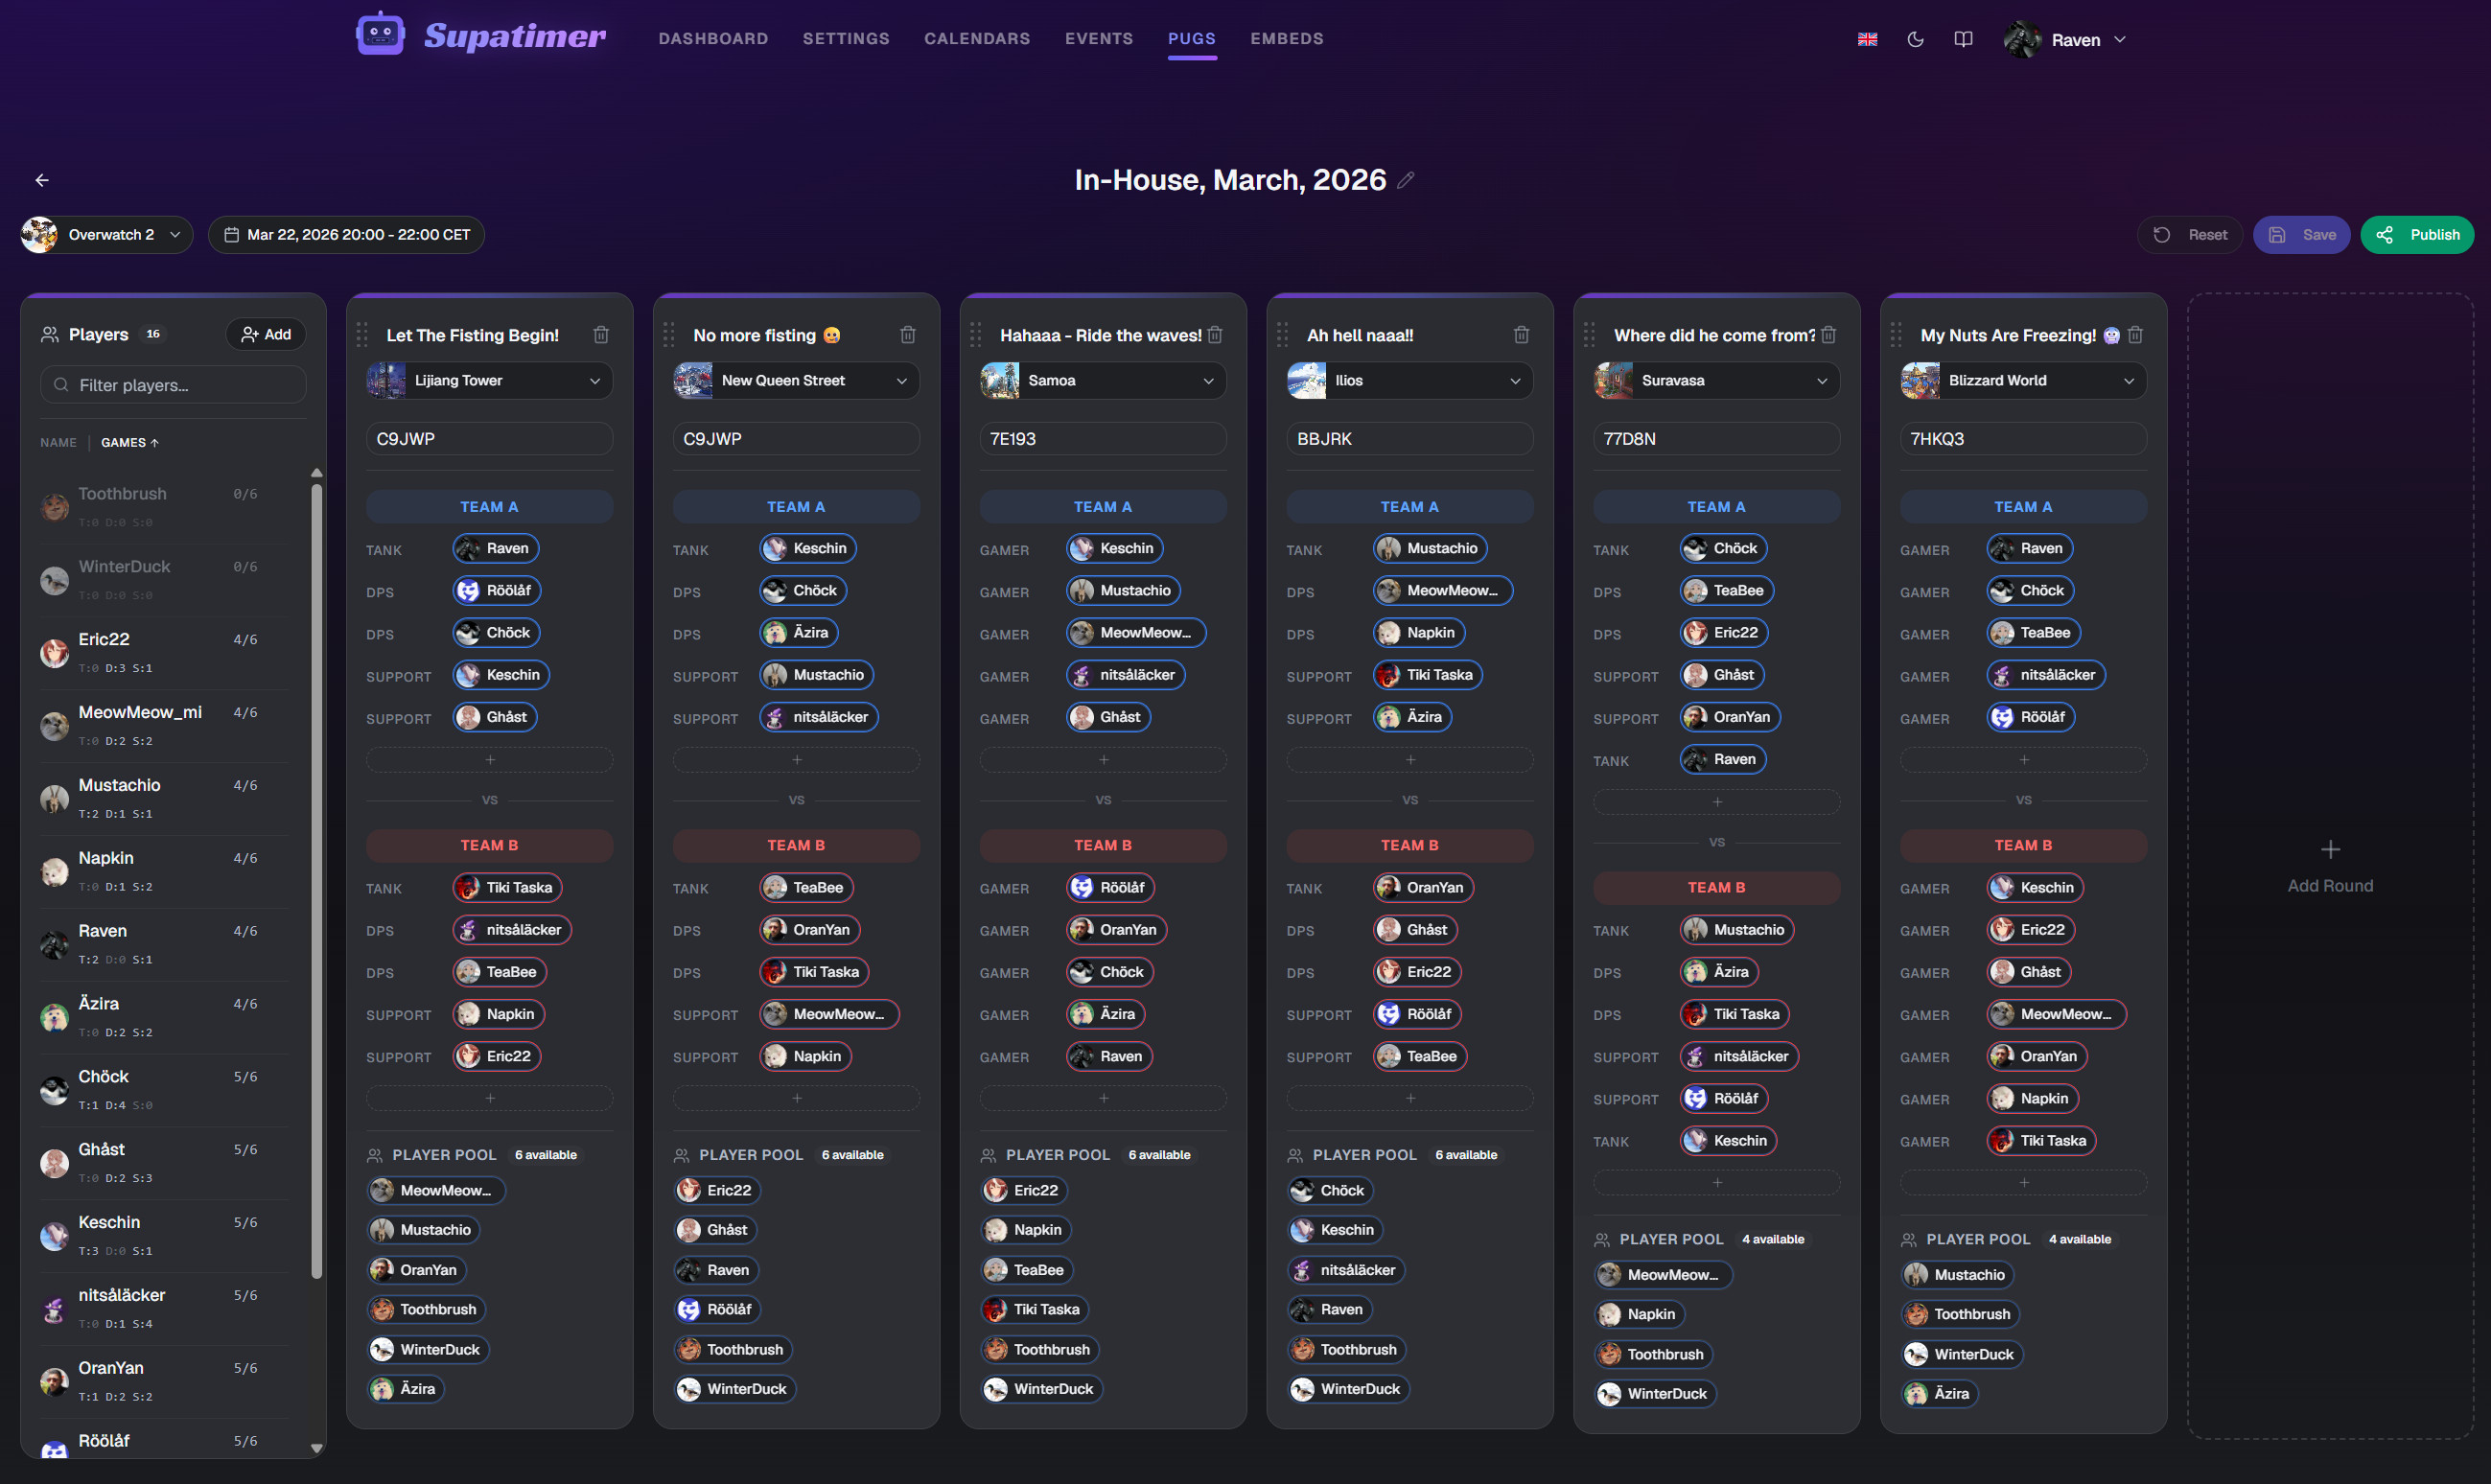
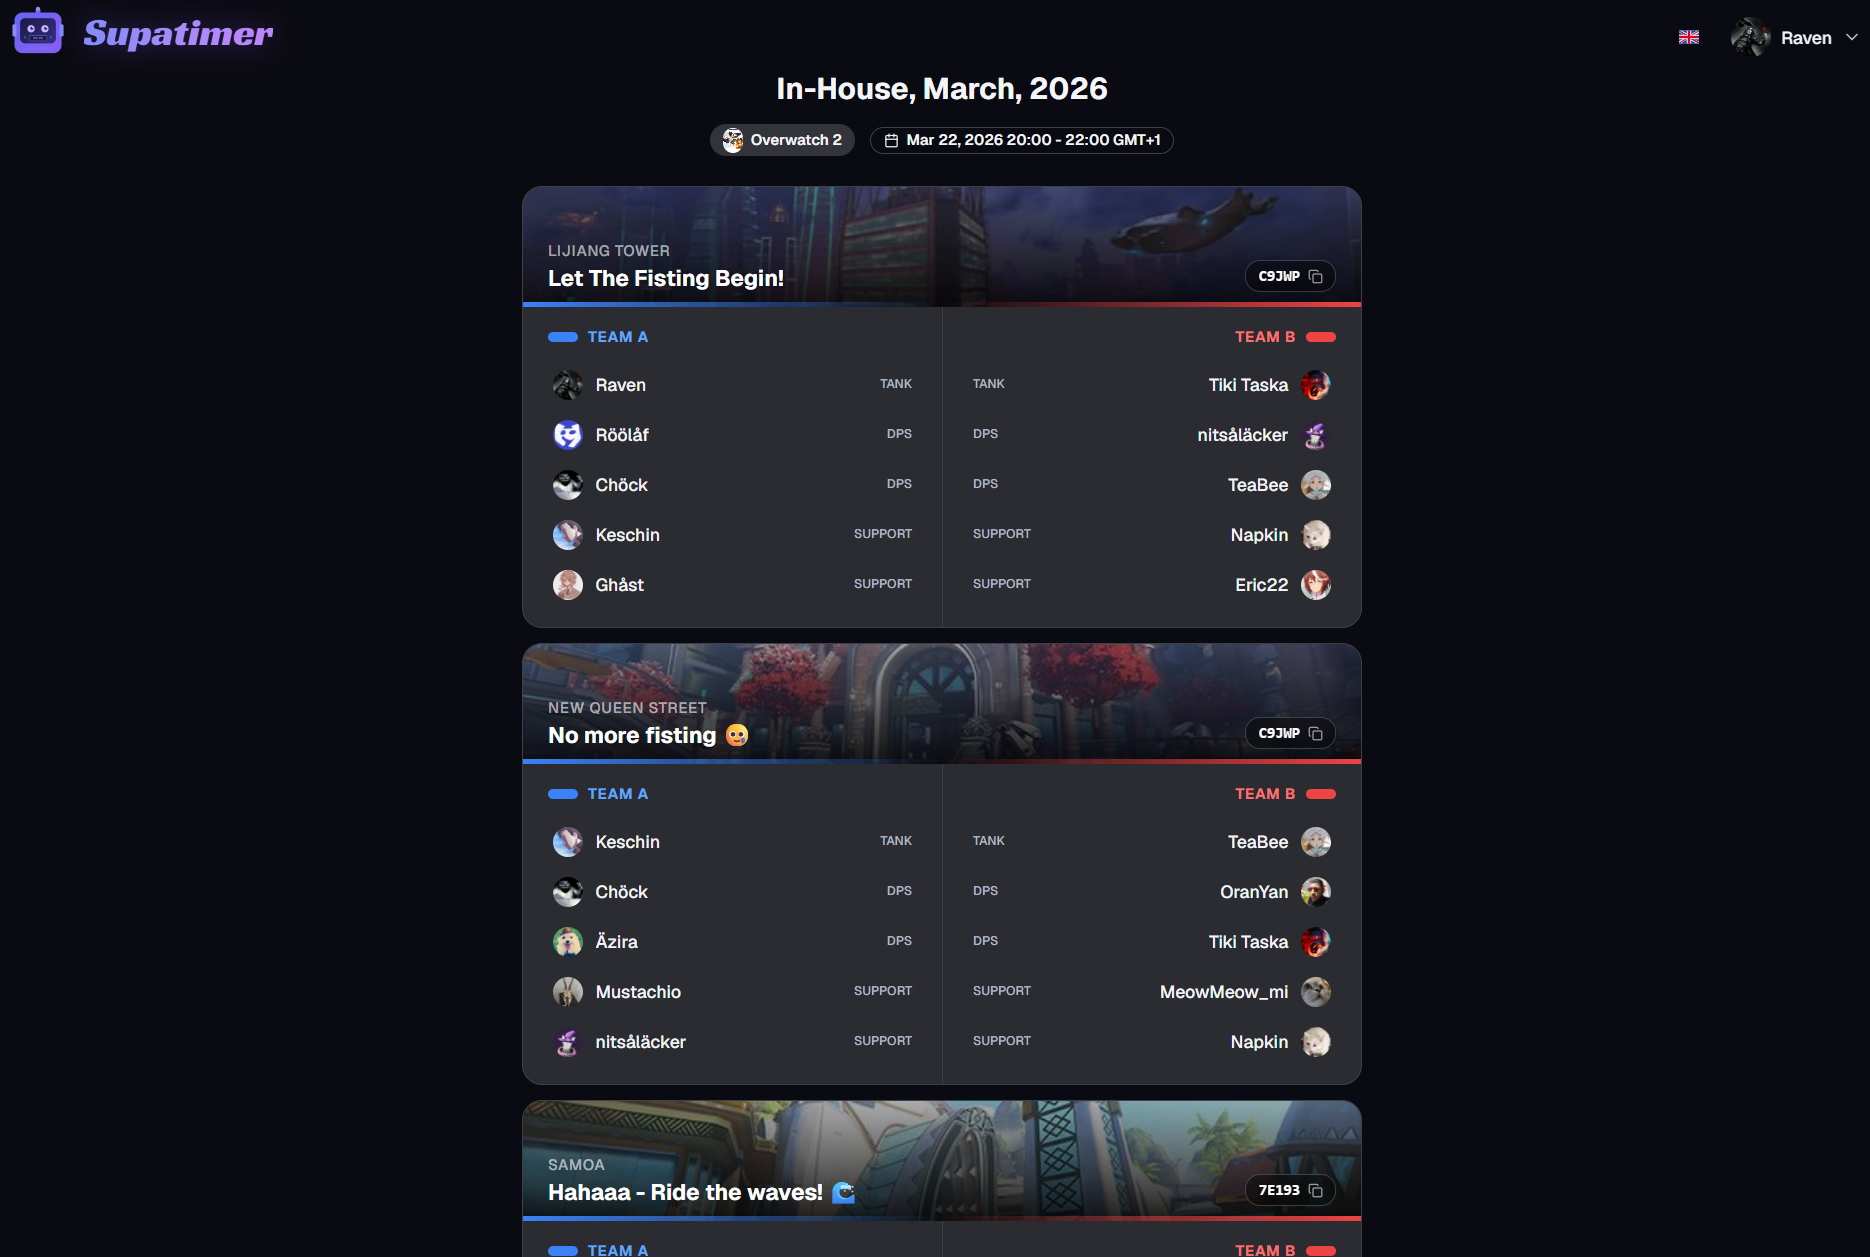
PUGs-Planer
Der PUGs-Planer hilft beim Organisieren von Pickup-Spielsitzungen.
Anleitung
- 1Navigiere zum 'PUGs-Planer' im Werkzeuge-Menue.
- 2Klicke 'PUG erstellen', um eine neue Sitzung zu starten.
- 3Fuege Spieler aus deinem Server zum Sitzungsroster hinzu.
- 4Erstelle Runden und weise Spieler per Drag-and-Drop den Team-Slots zu.
- 5Klicke den Teilen-Button, um einen oeffentlichen Link zu generieren.
- 6Nutze 'In Discord posten', um ein Embed in einen Kanal zu senden.
Screenshots

Einstellungen
Einstellungen listet alle Discord-Server, in denen du und der Bot Mitglied seid. Waehle einen Server, um dessen Bereiche zu oeffnen. Je nach Rolle siehst du unterschiedliches: Alle koennen Kalender ansehen; Team-Manager und Admins erhalten zusaetzliche Werkzeuge.
Bereiche innerhalb eines Servers
- Server-EinstellungenAdmin
Erlaubte Kanaele, Rollen, Zeitslots und botweite Optionen. Entspricht /config im Web.
- Team-EinstellungenTeam-Manager
Teams anlegen und verwalten: Kanaele, Spielauswahl, Posts, Ping-Rollen und Scrim-Austausch.
- MitgliederverzeichnisTeam-Manager
Mitglieder durchsuchen und Rollen, Spielerstatus und Lineup-Felder fuer verwaltete Teams einstellen.
- Kalender ansehenAlle
Aktive und vergangene Verfuegbarkeitskalender dieses Servers. Fuer alle sichtbar, die den Server unter Einstellungen sehen.
Anleitung
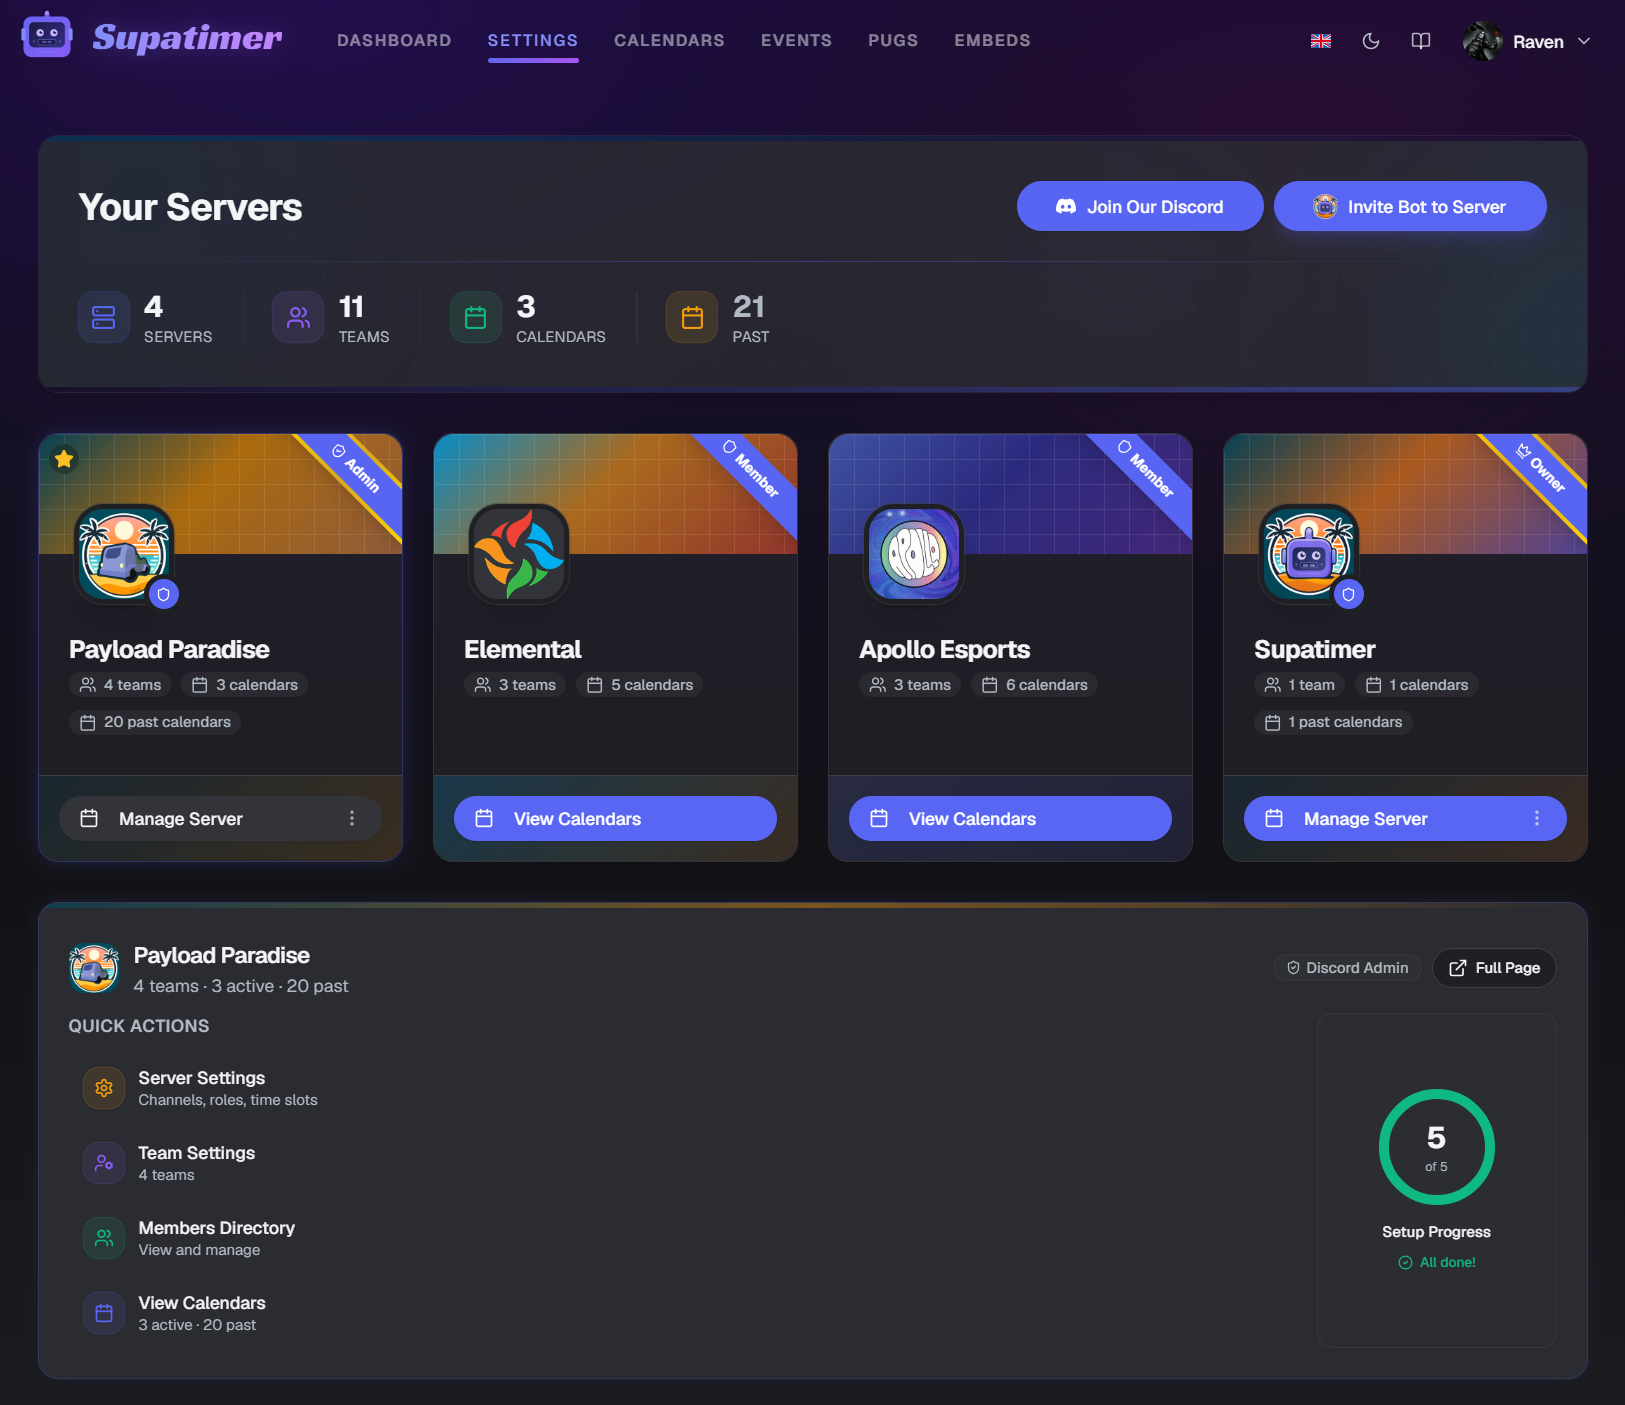
- 1Navigiere zu 'Einstellungen' im oberen Menue. Jede Karte zeigt Icon, Name und deine Zugriffsstufe.
- 2Der Bereich oben zeigt Statistiken: Gesamtzahl Server, Teams und aktive Kalender.
- 3Klicke das Stern-Icon, um einen Server als Favorit zu markieren.
- 4Klicke auf eine Serverkarte, um diesen Server zu oeffnen. Dort stehen Kalender ansehen (alle), Team-Einstellungen und Mitgliederverzeichnis (Team-Manager und hoeher) sowie Server-Einstellungen (Admins) zur Verfuegung.
Ansehen
Screenshots
Abwesenheiten
Das Abwesenheitssystem laesst Teammitglieder kommende Nichtverfuegbarkeit melden.
Anleitung
- 1Deine Abwesenheiten erscheinen in der Karte 'Meine Abwesenheiten' auf dem Dashboard.
- 2Klicke 'Hinzufuegen', um eine neue Abwesenheit zu erstellen.
- 3Bearbeite oder loesche Abwesenheiten durch Klicken in der Liste.
- 4Team-Manager sehen eine 'Team-Abwesenheiten'-Karte.
- 5Abwesenheiten werden in der Kalenderverfuegbarkeit beruecksichtigt.
Screenshots

Spassbefehle
Supatimer bietet lockere soziale Befehle, die du in jedem Kanal verwenden kannst. Serveradministratoren koennen jeden Befehl in den Servereinstellungen ein- oder ausschalten.
Anleitung
- 1Tippe /roast und waehle ein Servermitglied bei der Option target. Der Bot postet einen zufaelligen Spruch, der den Spieler oeffentlich im Kanal erwaehnt.
- 2Die Sprueche werden zufaellig aus ueber 700 Zeilen ausgewaehlt - eine Mischung aus Gaming- und Alltagshumor. Jeder beginnt mit der @Erwaehnung des Ziels.
- 3Administratoren koennen /roast fuer einen Server unter Servereinstellungen > Spassbefehle deaktivieren. Wenn deaktiviert, erhaelt jeder, der es versucht, einen Hinweis.
- 4Neue Server haben /roast standardmaessig aktiviert. Schalte es jederzeit aus, wenn du eine ernstere Atmosphaere bevorzugst.
Admin & Teamverwaltung
Mitgliederverzeichnis
Im Mitgliederverzeichnis konfigurieren Team-Manager und Admins die Spielrollen und den Status jedes Discord-Mitglieds.
Anleitung
- 1Oeffne 'Einstellungen' im oberen Menue, waehle einen Server, dann oeffne das Mitgliederverzeichnis.
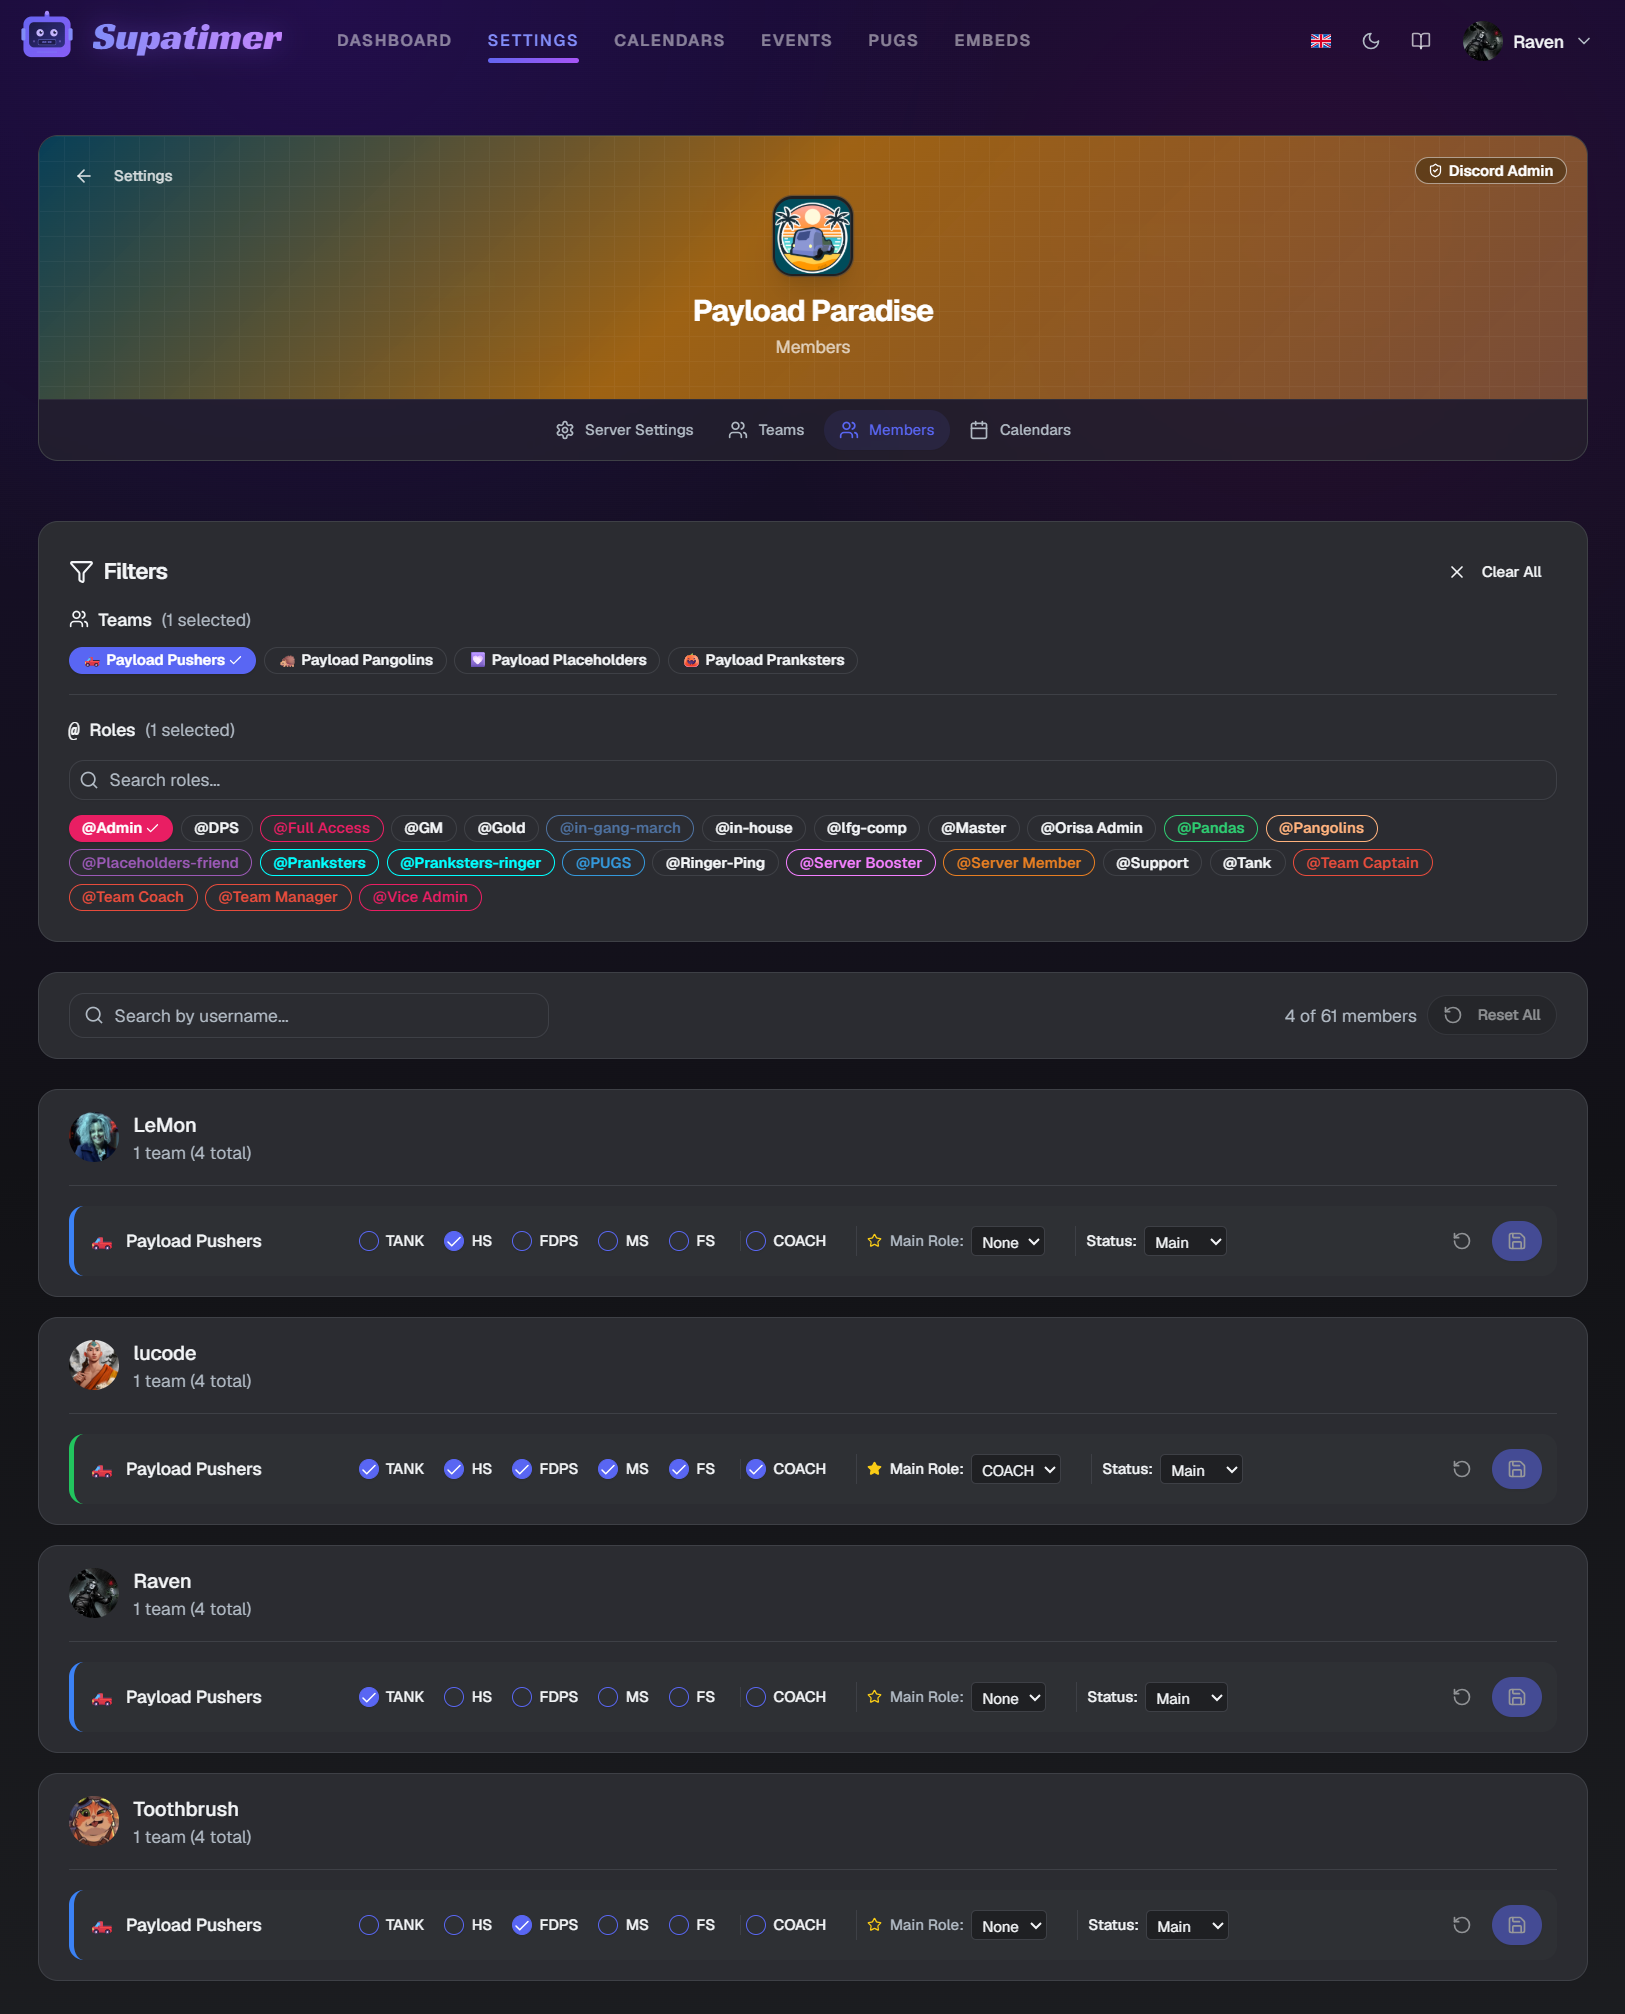
- 2Jede Zeile hat Kontrollkaestchen fuer spielspezifische Rollen.
- 3Stelle den Spielerstatus ein: Main, Tryout, Sub, Ringer oder Coach.
- 4Waehle eine Primaerrolle fuer jedes Mitglied.
- 5Nutze die Filterleiste zum Suchen nach Name, Discord-Rolle oder Team.
- 6Klicke 'Von oben kopieren', um Rollenzuweisungen schnell zu duplizieren.
- 7Aenderungen werden nicht automatisch gespeichert. Klicke den schwebenden 'Speichern'-Button.
Ansehen
Screenshots


Hinweis: Mitglieder zu konfigurieren ist essentiell fuer /weekplan und automatische Lineup-Generierung.
Team-Einstellungen
Teams gruppieren deine Mitglieder und verknuepfen sie mit Discord-Kanaelen.
Anleitung
- 1Oeffne 'Einstellungen' im oberen Menue, waehle einen Server, dann oeffne Team-Einstellungen.
- 2Jede Teamkarte zeigt den Teamnamen, SR/Rang und einen Konfigurationsstatus-Badge. Admins finden hier einen Team-hinzufuegen-Button - waehle den Kanal des Teams und du landest direkt in dessen Einstellungen.
- 3Klicke auf eine Karte, um die Einstellungen zu oeffnen.
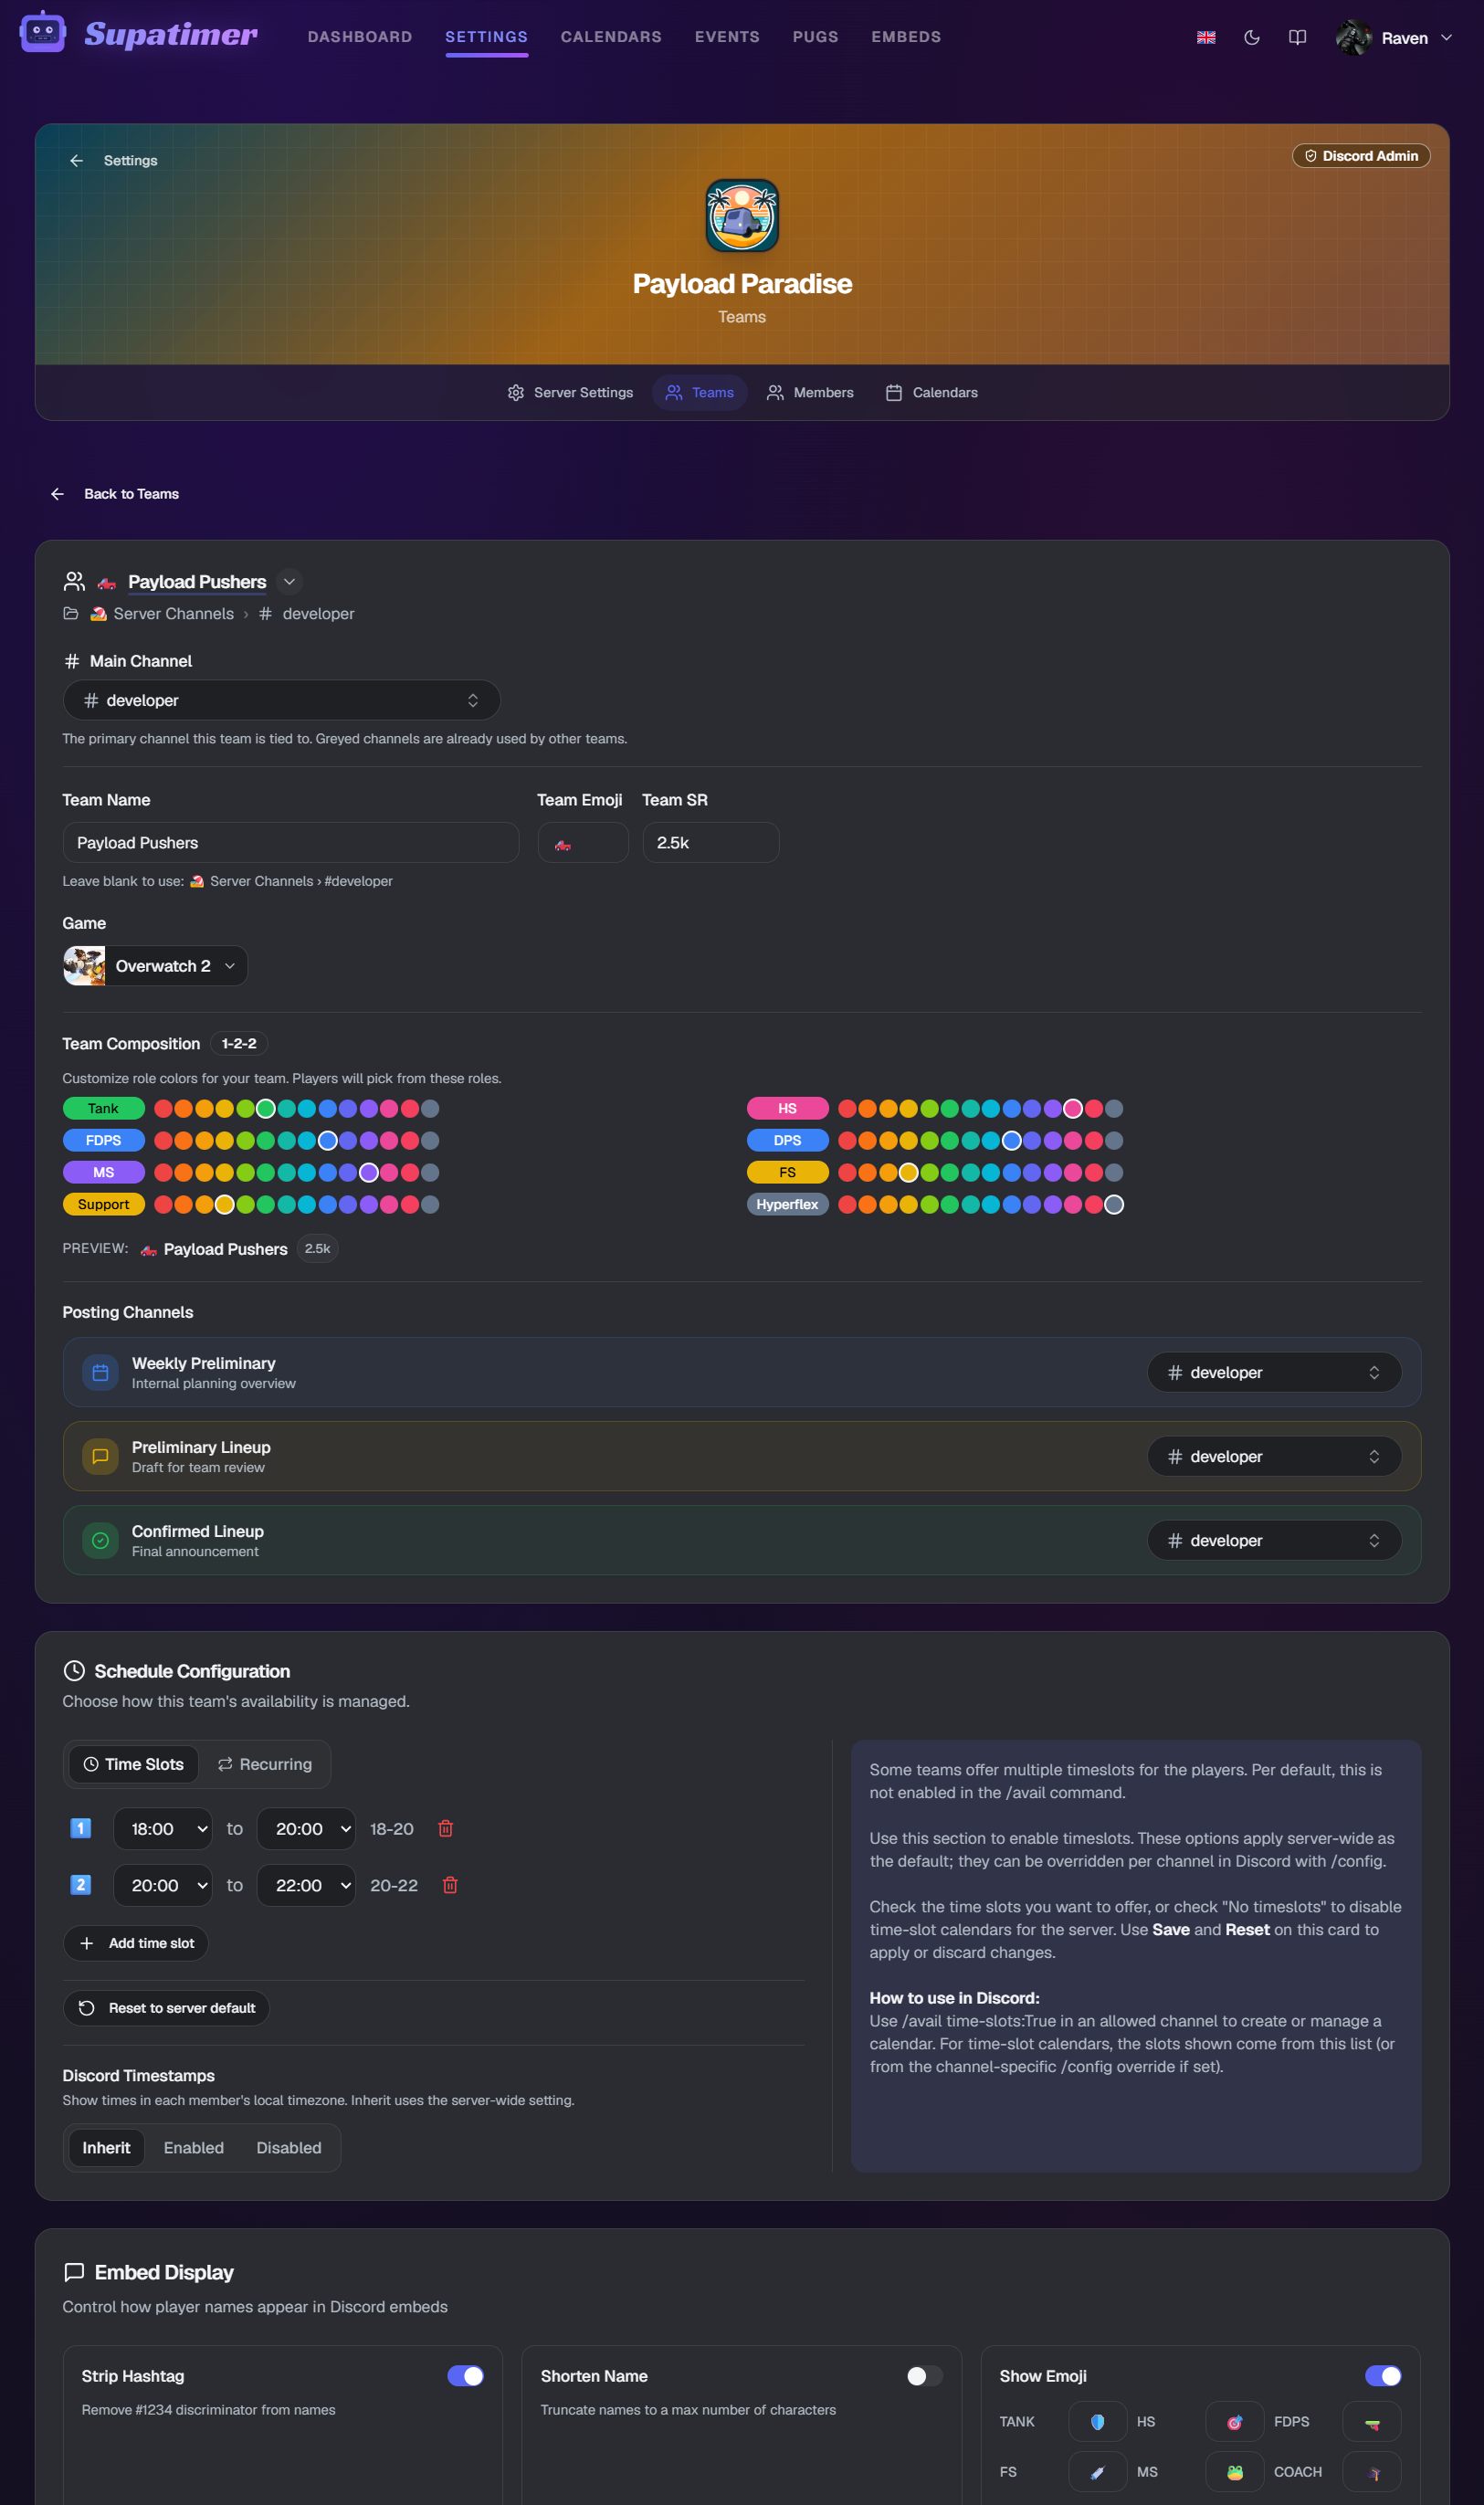
- 4Waehle ein Spiel fuer dein Team. Dies steuert Teamgroesse, Rollenstruktur und Anzeige.
- 5Der Bereich Teamzusammensetzung zeigt das Spielformat. Passe Rollenfarben an.
- 6Lege Posting-Kanaele fest.
- 7Lege Ping-Rollen fest.
- 8Ueberschreibe Discord-Zeitstempel pro Team - waehle Erben, Aktiviert oder Deaktiviert.
- 9Konfiguriere Scrim-Austausch-Infos (Stagger, Kill Cam, Hero Bans, Host).
- 10Richte einen Map Pool fuer Overwatch-Teams ein.
- 11Teile Scrim-Austausch-Infos oeffentlich ueber den Teilen-Button.
- 12Loesche ein Team in der Gefahrenzone unten in seinen Einstellungen - tippe delete zum Bestaetigen. Das gibt den Kanal des Teams frei und entfernt seine Einstellungen; bereits gepostete Kalender bleiben erhalten. Nur Admins.
- 13Lege auf der Zeitplan-Karte eine Zeitzone fuer das Team fest. Erben folgt der Serverzeitzone (Standard); waehle eine Zone, um sie zu ueberschreiben - nuetzlich, wenn deine Teams nicht in derselben Region sind. Die Sommerzeit wird in beiden Faellen automatisch beruecksichtigt.
Ansehen
Screenshots
Server-Einstellungen
In den Server-Einstellungen konfigurieren Admins, welche Discord-Kanaele und Rollen der Bot verwenden darf.
Anleitung
- 1Oeffne 'Einstellungen' im oberen Menue, waehle einen Server, dann oeffne Server-Einstellungen.
- 2Erlaubte Kanaele - Waehle, in welchen Kanaelen der Bot posten darf.
- 3Erlaubte Rollen - Waehle, welche Rollen Bot-Befehle nutzen duerfen.
- 4Admin-Rollen - Waehle Rollen mit Admin-Zugriff auf den Bot.
- 5Zeitslots - Konfiguriere verfuegbare Zeitslots pro Kanal.
- 6Discord-Zeitstempel - Aktiviere, um Zeiten in der lokalen Zeitzone anzuzeigen.
- 7Jede Karte hat einen Info-Button, der die Einstellung erklaert.
Ansehen
Hinweis: Fuer die Ersteinrichtung bietet /setup in Discord einen gefuehrten Assistenten.
Erste Schritte
Erste Schritte
Der Onboarding-Ablauf fuehrt dich durch die Ersteinrichtung von Supatimer.
Anleitung
- 1Wenn du den Bot zum ersten Mal zu einem Server hinzufuegst, erscheint eine Erste-Schritte-Checkliste auf der Einstellungsseite fuer diesen Server.
- 2Die Checkliste fuehrt dich durch: Kanaele konfigurieren, ersten Kalender posten, Teams und Mitglieder in Einstellungen einrichten.
- 3Du kannst auch die gefuehrte Tour vom Willkommensbanner starten.
- 4Die Tour hebt jeden Teil des Dashboards mit Schritt-fuer-Schritt-Erklaerungen hervor.
- 5Du kannst Schritte ueberspringen und spaeter zurueckkommen.
- 6Bereits abgeschlossene Schritte werden automatisch als erledigt markiert.
Ansehen
Brauchst du Hilfe? Tritt unserem Discord-Server bei oder schau in die Discord-Bot-Befehle Referenz.